Alright so the build works, here are a bunch of pictures!
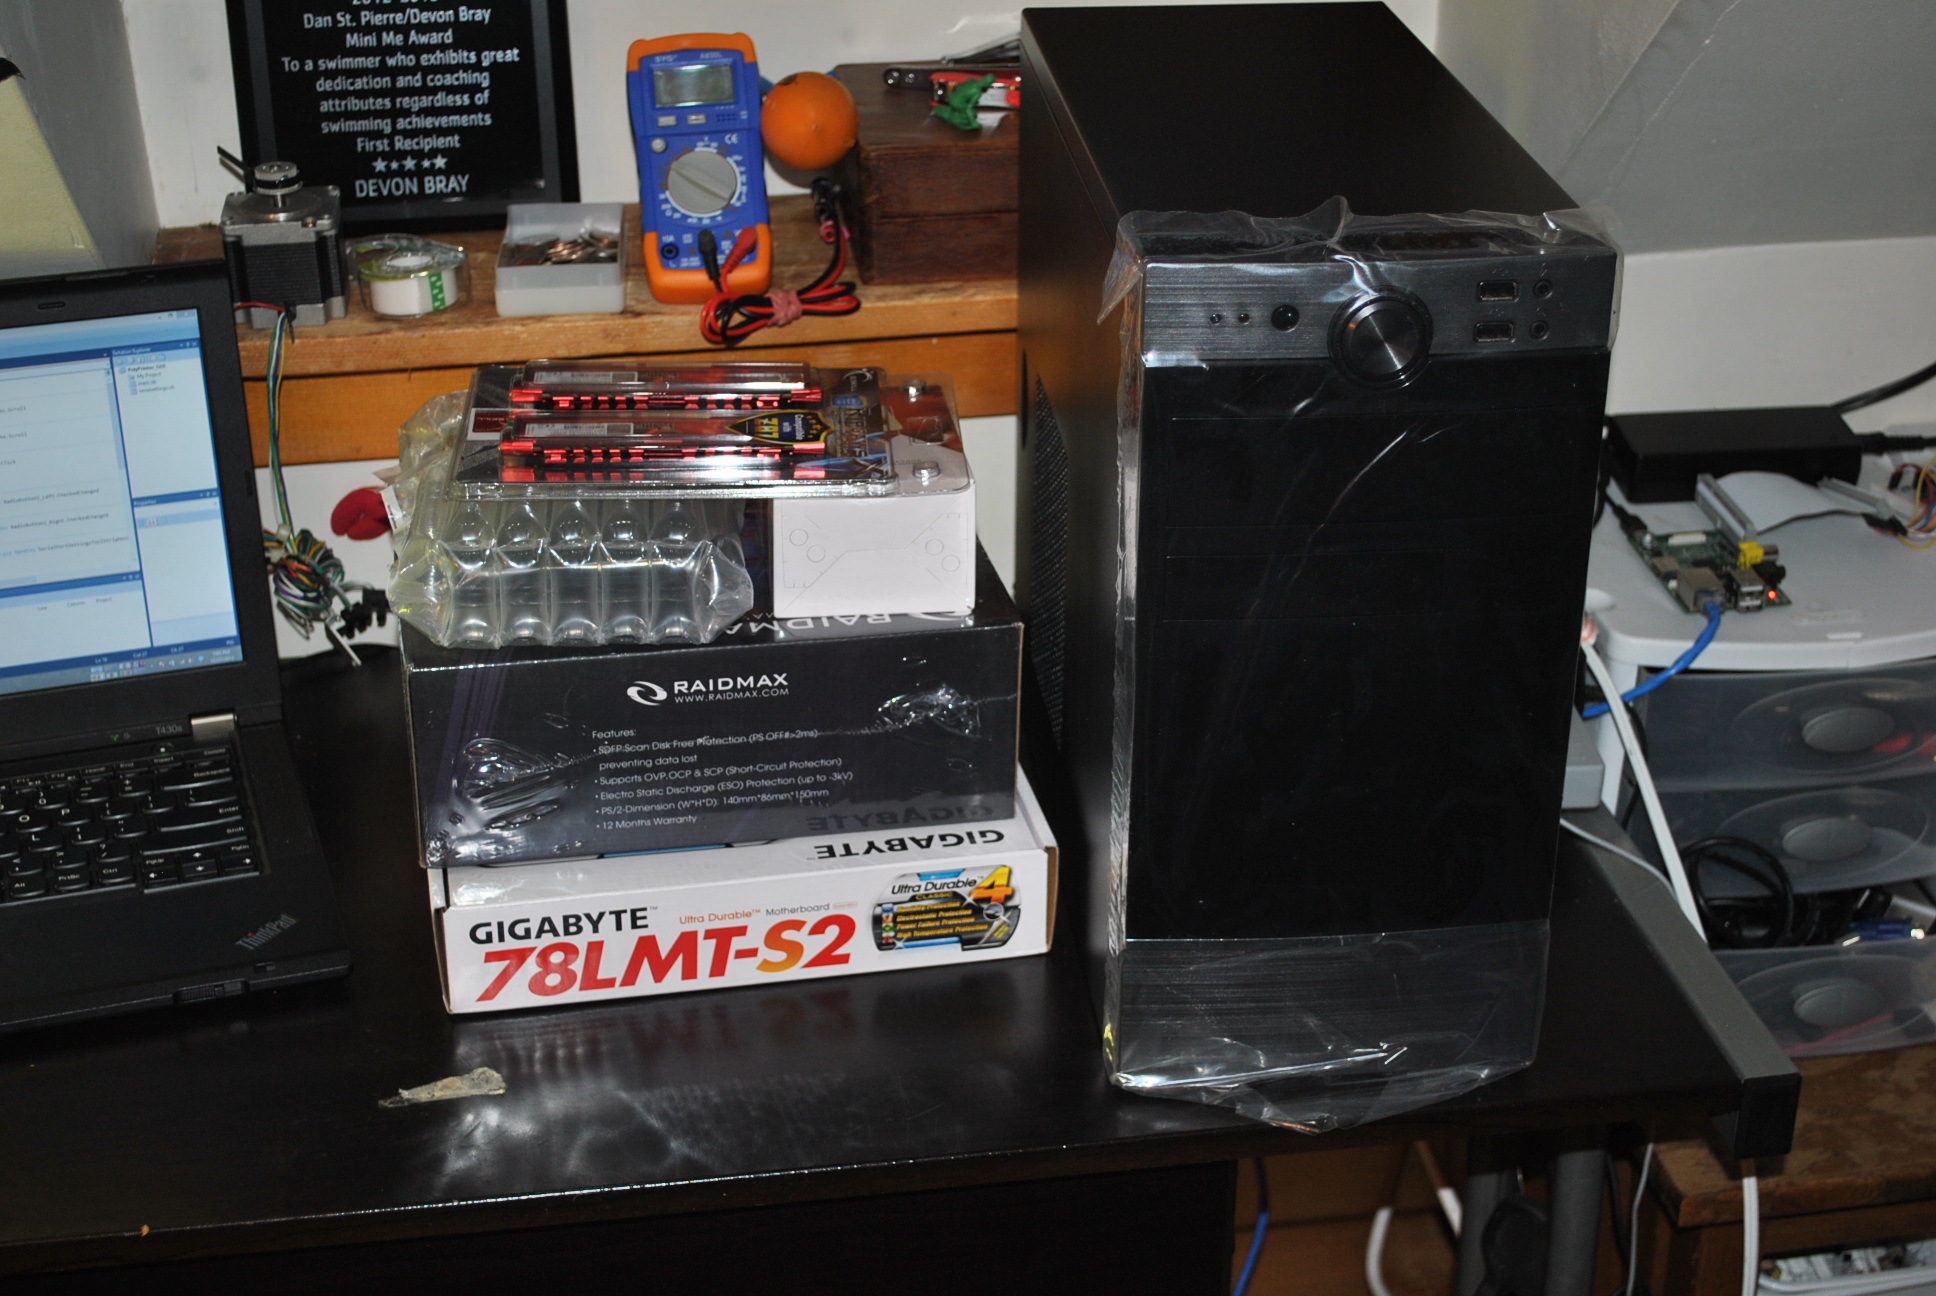
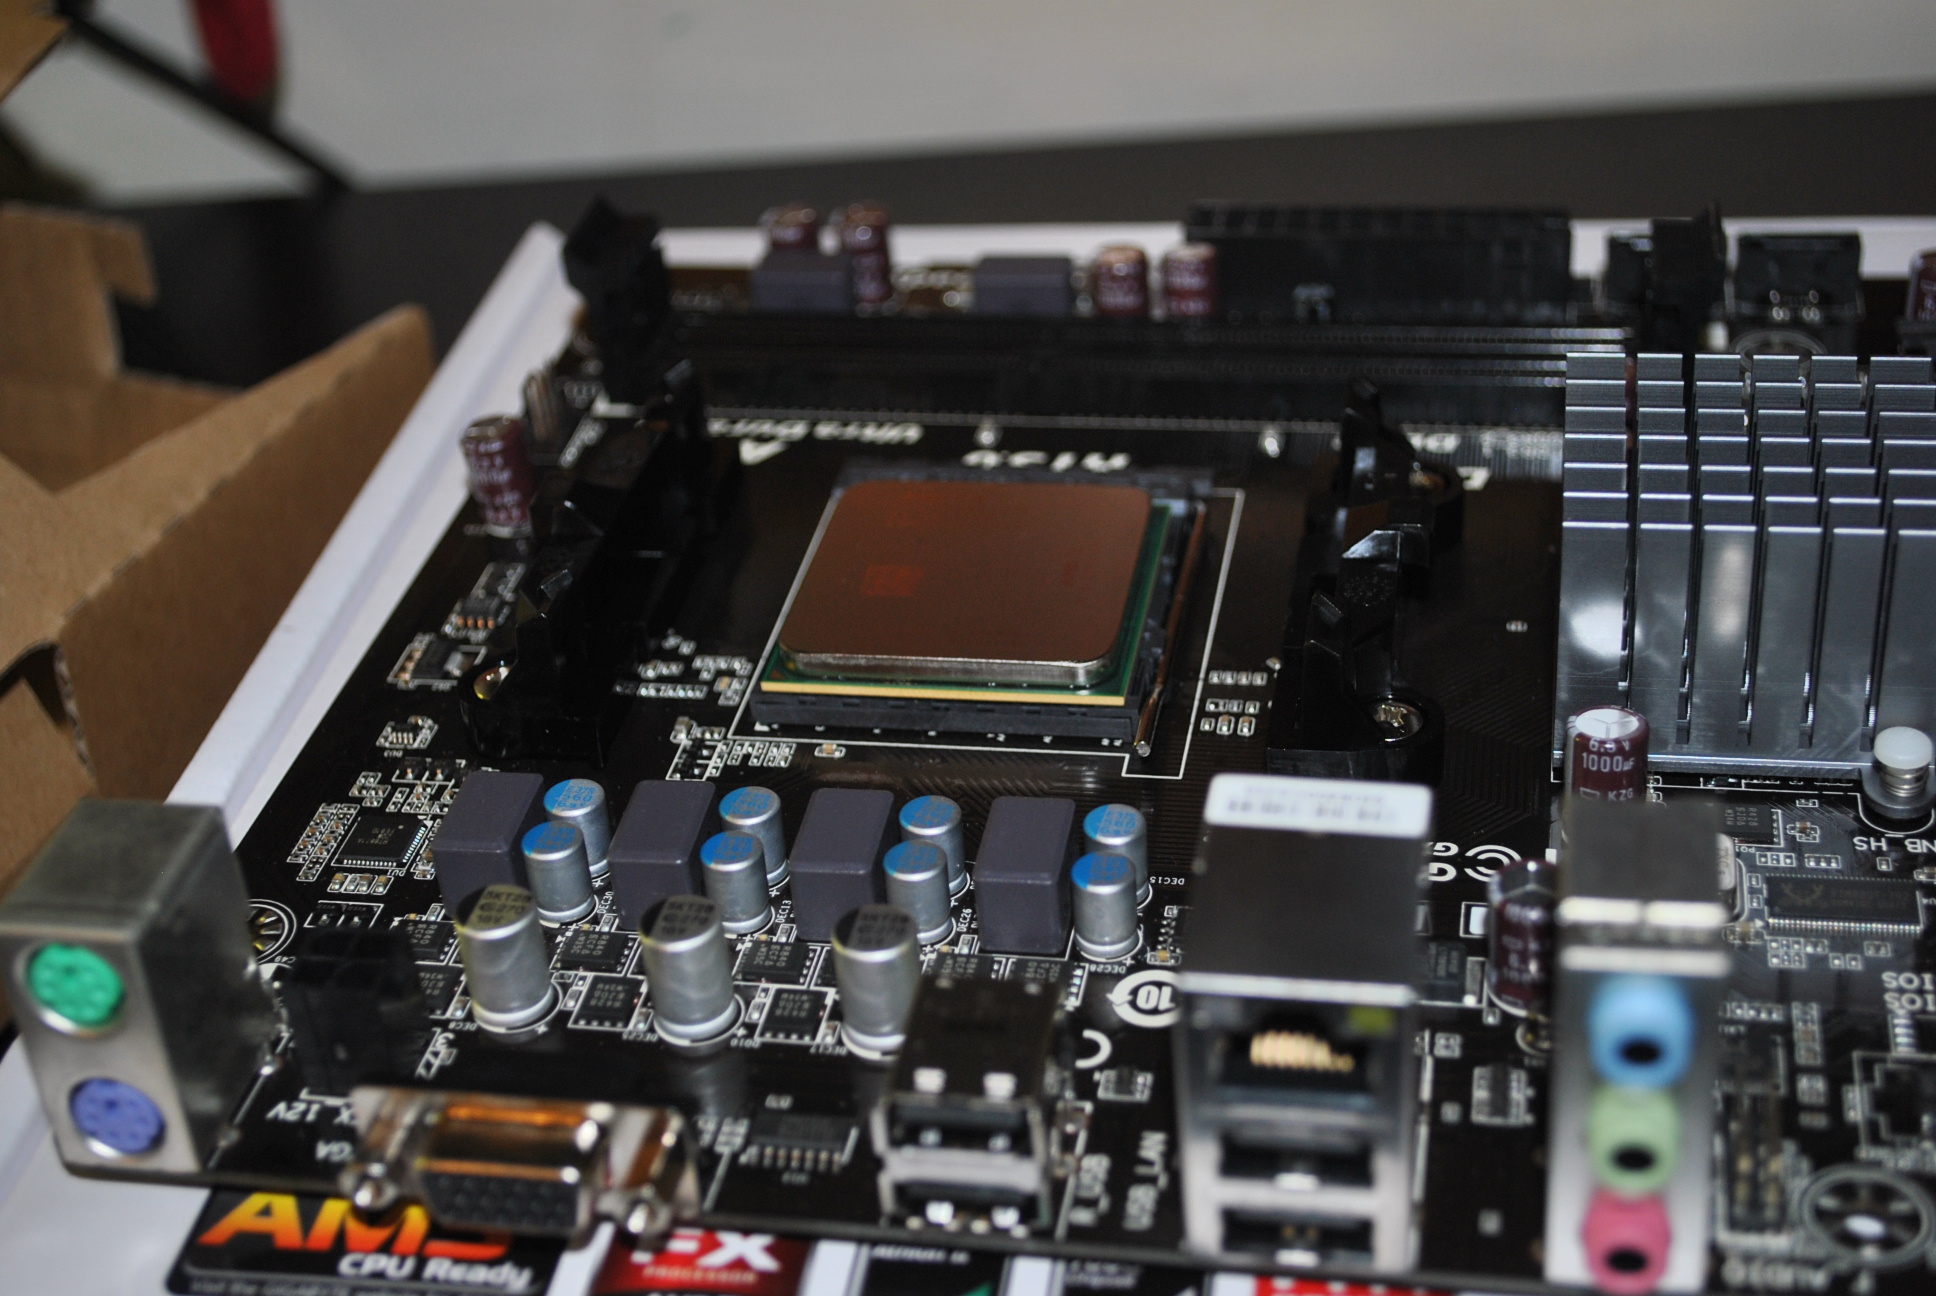


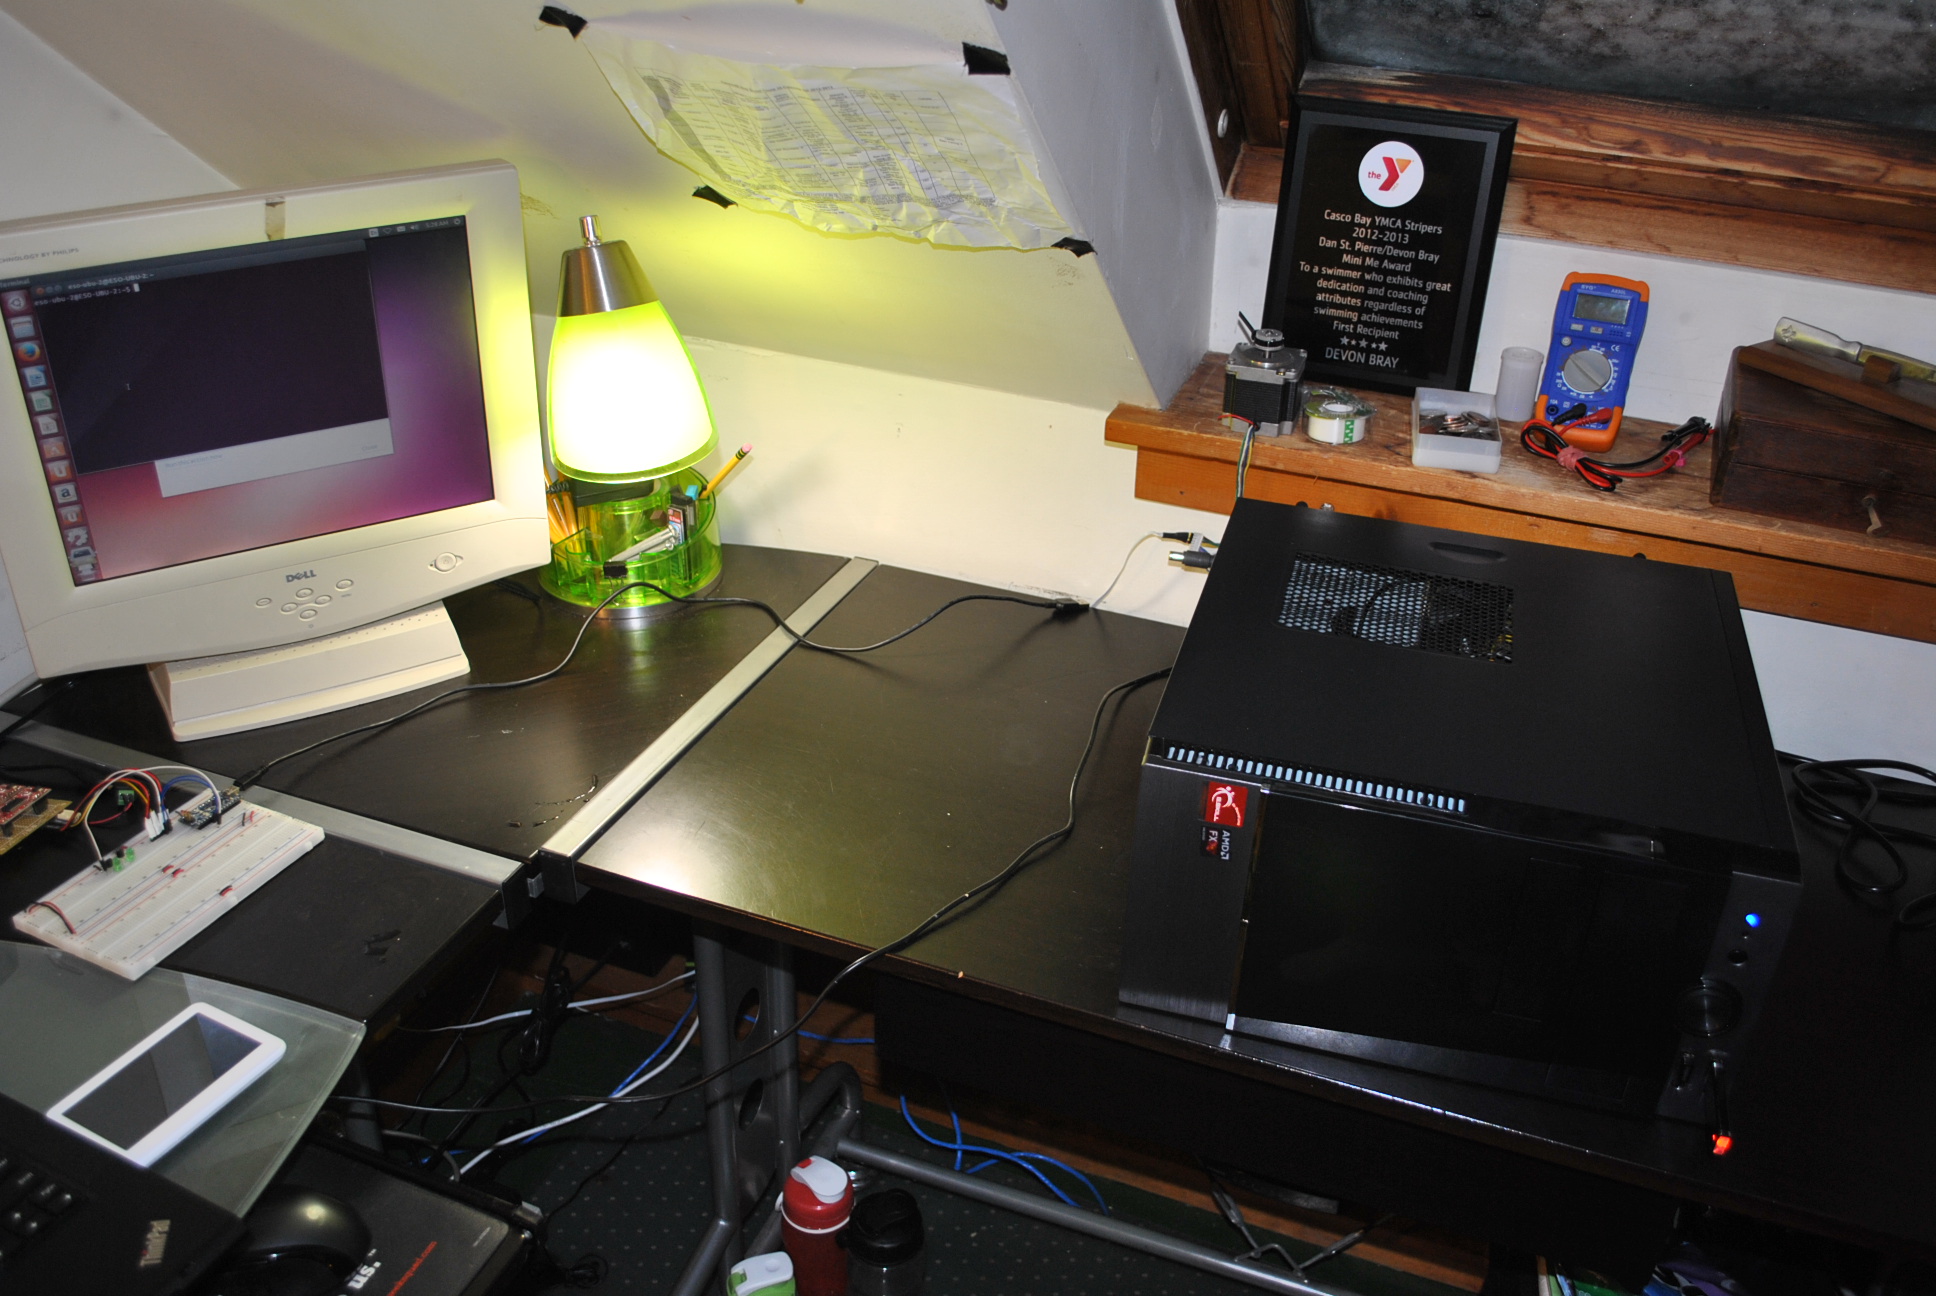
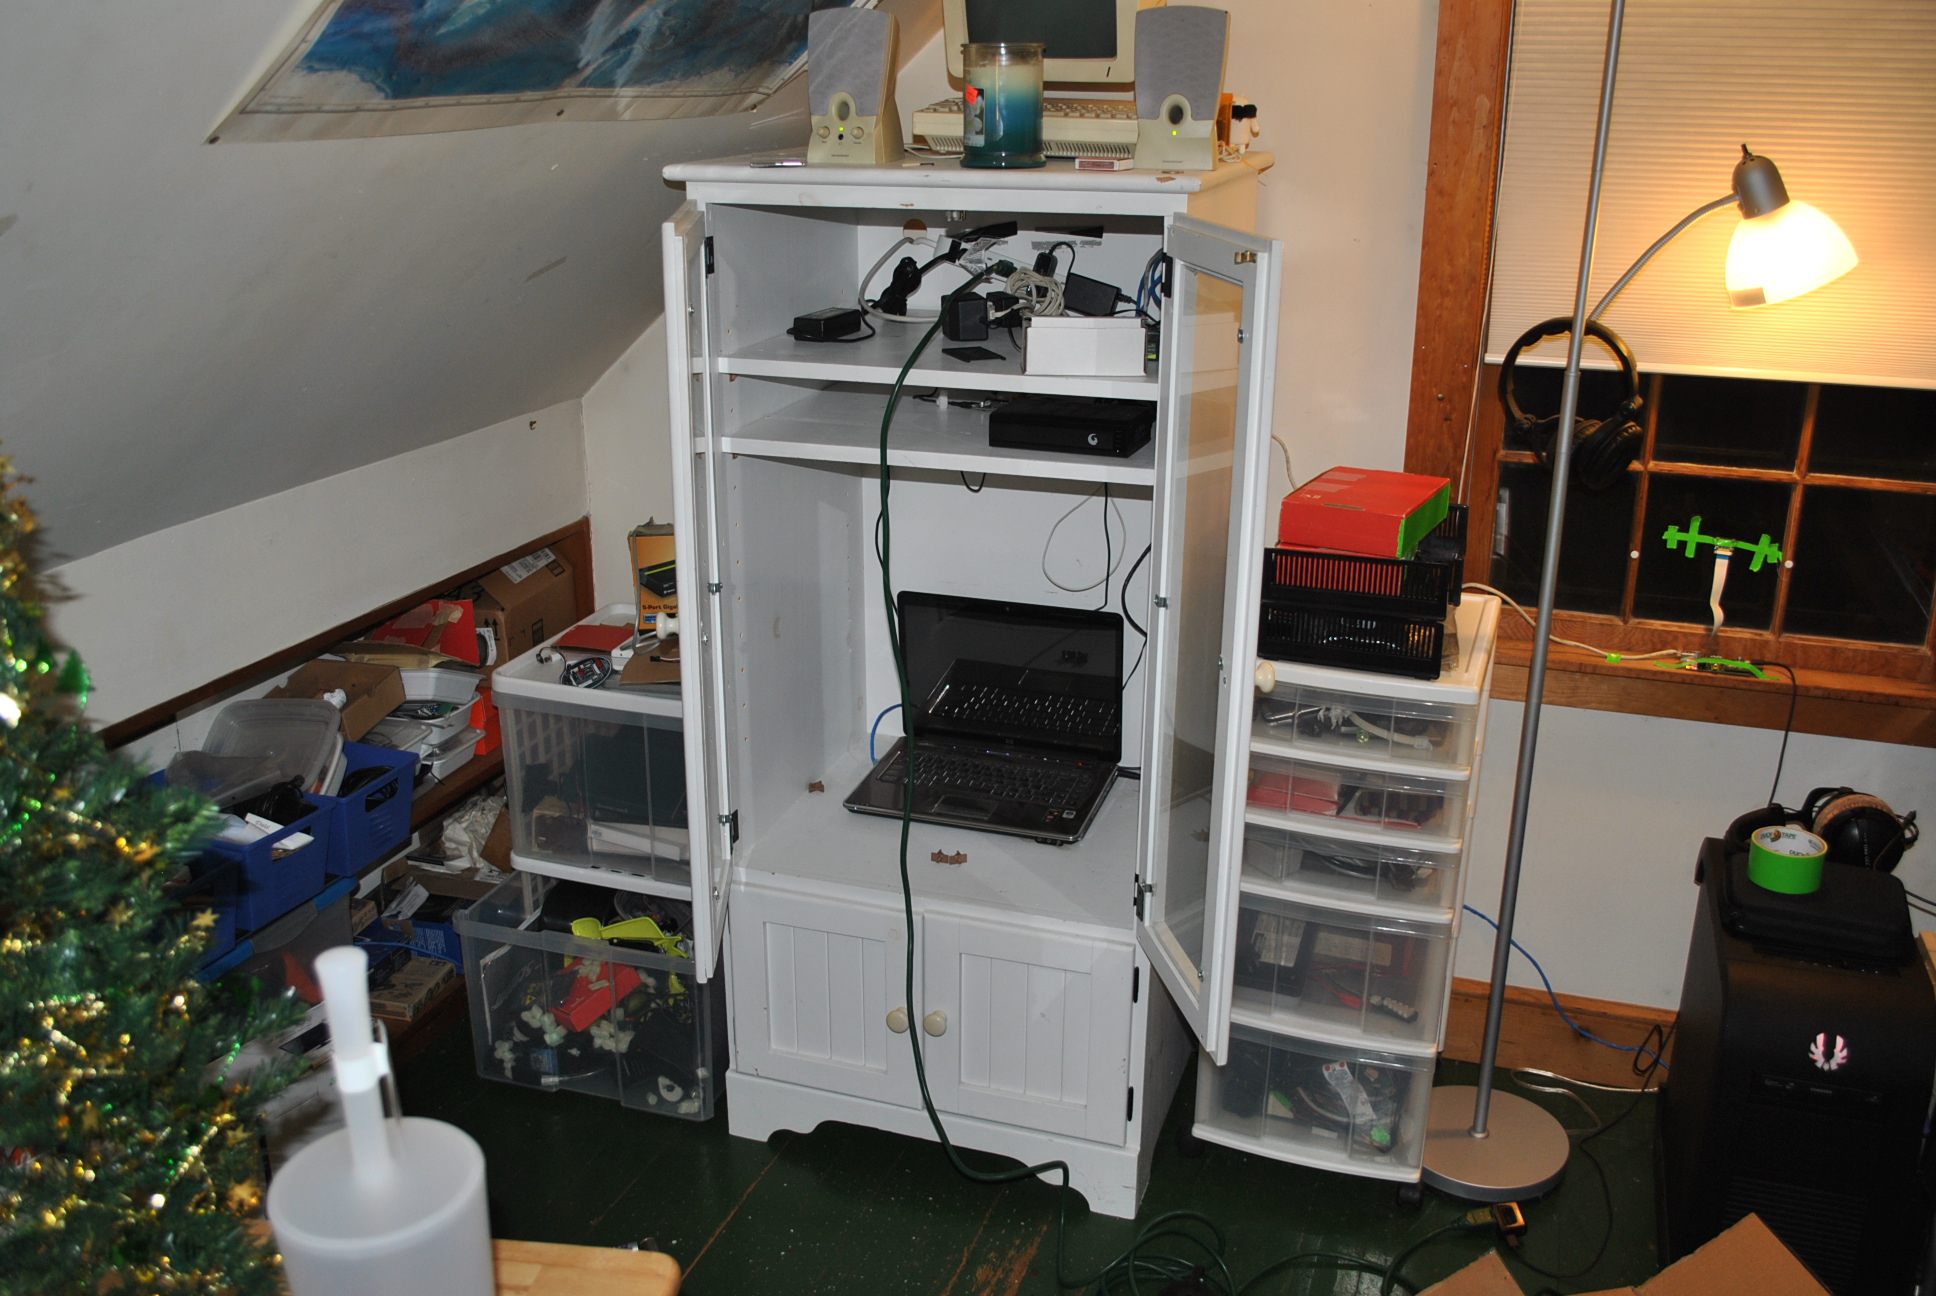
The final setup!

Alright so the build works, here are a bunch of pictures!
The final setup!
Turns out it’s not that hard at all! Here’s a video of the whole thing working:
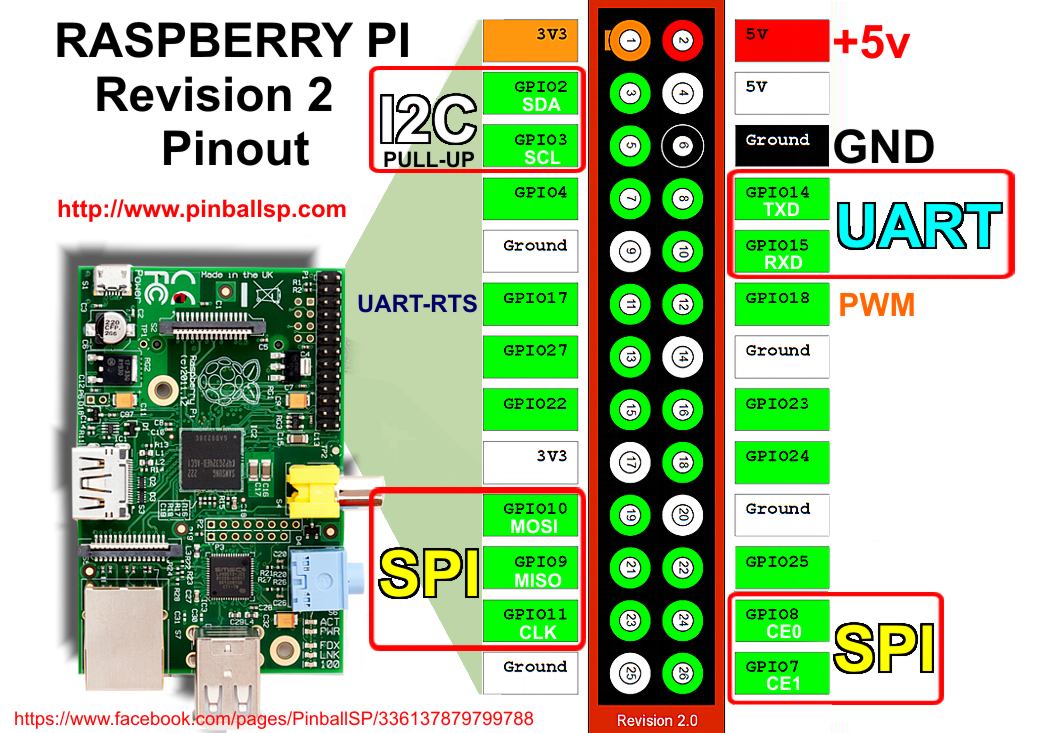
This basically works around concepts I first explained here. It’s still really cool though! SPI is really fast and really easy to use, perfect for a novice like me.
Here are the physical representations and schematics of the setup seen on my desk:
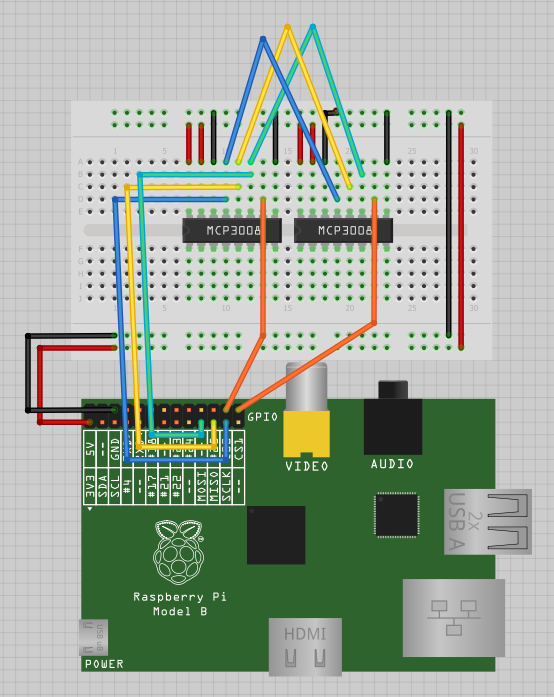
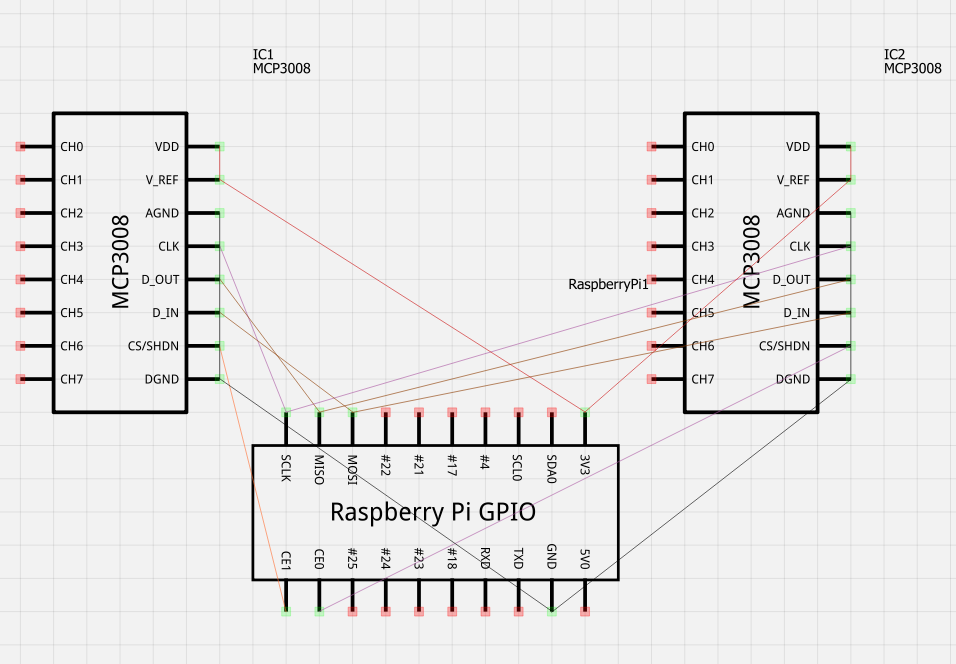
Images generated by fritzing.
Here’s the code that makes it all work!
|
1 2 3 4 5 6 7 8 9 10 11 12 13 14 15 16 17 18 19 20 21 22 23 24 25 26 27 28 29 30 |
#first ADC setup on SPI port 0 import spidev spi_0 = spidev.SpiDev() spi_0.open(0, 0) #this fucntion can be used to find out the ADC value on ADC 0 def readadc_0(adcnum_0): if adcnum_0 > 7 or adcnum_0 < 0: return -1 r_0 = spi_0.xfer2([1, 8 + adcnum_0 << 4, 0]) adcout_0 = ((r_0[1] & 3) << 8) + r_0[2] return adcout_0 #first ADC setup on SPI port 1 import spidev spi_1 = spidev.SpiDev() spi_1.open(0, 1) #this fucntion can be used to find out the ADC value on ADC 1 def readadc_1(adcnum_1): if adcnum_1 > 7 or adcnum_1 < 0: return -1 r_1 = spi_1.xfer2([1, 8 + adcnum_1 << 4, 0]) adcout_1 = ((r_1[1] & 3) << 8) + r_1[2] return adcout_1 while 1: for x in range (0, 8): print 'Port ' + str(x) + ' | ' + 'adc_0: ' + str(readadc_0(x)).zfill(4) + ' | ' + 'adc_1: ' + str(readadc_1(x)).zfill(4) print '----------------------------------' |
Here is some further reading:
http://www.megaleecher.net/sites/default/files/images/raspberry-pi-rev2-gpio-pinout.jpg
http://hertaville.com/2013/07/24/interfacing-an-spi-adc-mcp3008-chip-to-the-raspberry-pi-using-c/
http://tightdev.net/SpiDev_Doc.pdf
Thanks for reading!
Here’s a video:
So in my last post I showed you a way that I used a single arduino to talk to a Raspberry Pi (or any other computer) over HID. I’ve updated the project a bit and now I can input any number of things into the pi. Basically this is how it works.
Serial Console on computer -> Arduino Mega -> software serial port -> Arduino micro -> HID on other second computer (in this case the Pi)
There are two buttons that handle pressing the enter key and the delete key as those are hard to send over serial.
There are a few bits of relevant code, both for the arduino. Here’s the mega’s code:
|
1 2 3 4 5 6 7 8 9 10 11 12 13 14 15 16 17 18 19 20 21 22 23 24 25 26 27 28 29 30 31 32 33 |
int sent_led = 44; int test_button = 30; byte inread; #include <SoftwareSerial.h> SoftwareSerial SoftSerial(34, 36); // RX, TX void setup(){ pinMode(sent_led, OUTPUT); pinMode(test_button, INPUT); Serial.begin(9600); SoftSerial.begin(4800); SoftSerial.println("Hello, world?"); } void loop(){ if (Serial.available()>0){ digitalWrite(sent_led, HIGH); Serial.print("Sending: "); inread = Serial.read(); Serial.write(inread); SoftSerial.write(inread); Serial.print(" , "); Serial.print(inread); Serial.println(""); digitalWrite(sent_led, LOW); } } |
And here’s the side for the arduino micro, that writes as an HID.
|
1 2 3 4 5 6 7 8 9 10 11 12 13 14 15 16 17 18 19 20 21 22 23 24 25 26 27 28 29 30 31 32 33 34 35 36 37 38 39 40 41 42 43 44 45 46 47 48 49 50 51 52 53 54 55 |
int stat_led = 3; int enter_led = 4; int delete_led = 5; int enter_button = 6; int delete_button = 7; int engage_switch = 8; #include <SoftwareSerial.h> SoftwareSerial SoftSerial(11, 10); // RX, TX void setup(){ pinMode(enter_led, OUTPUT); pinMode(delete_led, OUTPUT); pinMode(stat_led, OUTPUT); pinMode(enter_button, INPUT); pinMode(delete_button, INPUT); pinMode(engage_switch, INPUT); Serial.begin(9600); SoftSerial.begin(4800); Keyboard.begin(); // } void loop(){ if (SoftSerial.available()){ digitalWrite(stat_led, HIGH); Keyboard.write(SoftSerial.read()); digitalWrite(stat_led, LOW); } if (digitalRead(enter_button) == HIGH){ Keyboard.press(KEY_RETURN); delay(100); Keyboard.release(KEY_RETURN); digitalWrite(enter_led, HIGH); } else if (digitalRead(enter_button) == LOW){ digitalWrite(enter_led, LOW); } if (digitalRead(delete_button) == HIGH){ digitalWrite(delete_led, HIGH); Keyboard.press(KEY_BACKSPACE); delay(100); Keyboard.release(KEY_BACKSPACE); } else if (digitalRead(delete_button) == LOW){ digitalWrite(delete_led, LOW); } } |
Hi guys!
So here’s the deal. I left for college about a week ago. I’m here now, and I don’t think I’m going to be able to continue doing this kind of stuff at the rate I’ve been doing it lately.
There will defiantly still be content on this website, I plan on continuing this thing until I physically can’t so no worries there.
I’ll keep you posted, thanks for reading.
Hi guys
So I’ve been eeking out all that I can of my last few days of summer, and there hasn’t been much rain or bad weather at all. As a result, I’m not posting much at all.
Doesn’t mean I’m not working though, I’ve been doing a couple things.
First thing’s first my speaker is done. I just need to get a bunch of video edited, and a big post written.
Secondly I’m still working really hard on my dead simple flickr uploader (dsfu). The cool thing about this project is that it has the potential to be very useful to quite a number of people, so I’m trying to make sure that it is very stable, and very easy to duplicate. This means for the most part I’ve been doing a series of 4000+ photo uploads trying to break my script. It’s happened a lot, and you can check my twitter feed to see my brain melt as I try and figure out the problem. This project won’t necessarily be “complete” until I have a 3D printer at my disposal to create the enclosure I want.
As for the PiPlanter, it’s still a work in progress. The update I did with my last post was a start to something really complete it is in no way finished. I still need to move the camera, and the plants.
Thanks for reading!
Here’s a video:
So basically the program indexes every single file on the SD card and then starts a scheduled interval process to upload them every single upload to flickr every 20 seconds. From there, it creates a set and indexes all of the upload responses and then walks though that list and adds each photo to that list. Then it emails the set URL with some other data.
I had a lot of problems with the flickr API timing out, and solved this problem by using APscheduler (easily my favorite package). You can see a more in depth chronicling my struggle on my twitter account.
I really want this project to be polished so I probably won’t be done with it for a while. I want to like 3D print a really nice looking enclosure and use a lot of panel mount components.
Here’s the python script:
|
1 2 3 4 5 6 7 8 9 10 11 12 13 14 15 16 17 18 19 20 21 22 23 24 25 26 27 28 29 30 31 32 33 34 35 36 37 38 39 40 41 42 43 44 45 46 47 48 49 50 51 52 53 54 55 56 57 58 59 60 61 62 63 64 65 66 67 68 69 70 71 72 73 74 75 76 77 78 79 80 81 82 83 84 85 86 87 88 89 90 91 92 93 94 95 96 97 98 99 100 101 102 103 104 105 106 107 108 109 110 111 112 113 114 115 116 117 118 119 120 121 122 123 124 125 126 127 128 129 130 131 132 133 134 135 136 137 138 139 140 141 142 143 144 145 146 147 148 149 150 151 152 153 154 155 156 157 158 159 160 161 162 163 164 165 166 167 168 169 170 171 172 173 174 175 176 177 178 179 180 181 182 183 184 185 186 187 188 189 190 191 192 193 194 195 196 197 198 199 200 201 202 203 204 205 206 207 208 209 210 211 212 213 214 215 216 217 218 219 220 221 222 223 224 225 226 227 228 229 230 231 232 233 234 235 236 237 238 239 240 241 242 243 244 245 246 |
#GPIO setup import RPi.GPIO as GPIO GPIO.setmode(GPIO.BOARD) in_flickr = 11 GPIO.setup(in_flickr, GPIO.IN) in_hdd = 13 GPIO.setup(in_hdd, GPIO.IN) button = 16 GPIO.setup(button, GPIO.IN) flickr_LED = 3 GPIO.setup(flickr_LED, GPIO.OUT) both_LED = 5 GPIO.setup(both_LED, GPIO.OUT) hdd_LED = 7 GPIO.setup(hdd_LED, GPIO.OUT) uploading_LED = 26 GPIO.setup(uploading_LED, GPIO.OUT) ready_LED = 24 GPIO.setup(ready_LED, GPIO.OUT) stat_LED = 22 GPIO.setup(stat_LED, GPIO.OUT) import os from apscheduler.scheduler import Scheduler import logging logging.basicConfig() import time #Flickr Setup import flickrapi api_key = '' api_secret = '' flickr = flickrapi.FlickrAPI(api_key, api_secret, format='json', cache=True) (token, frob) = flickr.get_token_part_one(perms='write') if not token: raw_input("Press ENTER after you authorized this program") flickr.get_token_part_two((token, frob)) #email setup import smtplib def sd_walk(): global file_list global file_number global filename global file_current print '-Starting File Index' for path, subdirs, files in os.walk(image_dir): for filename in files: if os.path.splitext(filename)[1].lower() in ('.jpg','jpeg'): listfiles = os.path.join(path, filename) file_list.insert(file_number,listfiles) print '--File: ' + str(file_number+1) + ' Added To List: ' + str(listfiles) file_number = file_number + 1 print '-Indexing Completed \n' print '---Starting Upload' def upload_file(): global file_list global file_number global filename global listfiles global file_current if file_current == int(len(file_list)): print '\n----All Files Dealt With...Terminating \n' global scheduler scheduler.shutdown(shutdown_threadpool=False) else: print '----Uploaing File: ' + str(file_current+1) + ' Of: ' + str(len(file_list)) + ' : ' + file_list[file_current] upload_response = flickr.upload(filename = file_list[file_current], format='etree') upload_ID = upload_response.find('photoid').text print '------Uploaded - Photo ID: ' + upload_ID id_list.insert(file_current,upload_ID) file_current = file_current + 1 def flickr_upload(): global id_list id_list = [] global file_list file_list = [] global file_current file_current = 0 global file_number file_number = 0 sd_walk() global scheduler scheduler = Scheduler(standalone=True) scheduler.add_interval_job(upload_file,seconds=20) scheduler.start() print '---Uploading completed - Adding Files To Set' set_name = 'Uploaded At ' + time.strftime('%m-%d-%y_%H-%M-%S') print '\n----Creating Set: ' + set_name print '----Primary Photo: ' + id_list[0] json_string = flickr.photosets_create(title=set_name, primary_photo_id=id_list[0]) global set_id set_id = json_string.split('"')[5] print '----Set Created: ' + set_id print '----Adding Files To list' global flickr_setno flickr_setno = 0 global scheduler scheduler = Scheduler(standalone=True) scheduler.add_interval_job(flickr_addset,seconds=1) scheduler.start() print '---All Photos Added, Flickr Process Complete \n' flickr_email(set_id,file_current,set_name) def flickr_addset(): global id_list global set_id global flickr_setno if flickr_setno == int(len(id_list)): print '\n----All IDs Dealt With...Terminating \n' global scheduler scheduler.shutdown(shutdown_threadpool=False) else: flickr.photosets_addPhoto(photoset_id=set_id, photo_id=id_list[flickr_setno]) print '-----Photo: ' + str(flickr_setno+1) + ' Of ' + str(len(id_list)) + ' Added To Set: ' + str(set_id) + ' ID: ' + str(id_list[flickr_setno]) flickr_setno = flickr_setno + 1 def flickr_email(idd,total_files,name): fromaddr = '' toaddrs = '' username = '' password = '' server = smtplib.SMTP('smtp.gmail.com:587') server.ehlo() server.starttls() server.ehlo() server.login(username,password) print 'Sending Email' SUBJECT = 'Your Photos Have Been Uploaded!' TEXT = 'Hello!\n\nYou Uploaded a total of: ' + str(total_files) + '\nYour Set is Named: "' + str(name) + '" \nYou can View These Photos Here: \n\n http://www.flickr.com/photos/99154806@N04/sets/' + str(idd) msg = 'Subject: %s\n\n%s' % (SUBJECT, TEXT) server.sendmail(fromaddr, toaddrs, msg) time.sleep(10) server.quit print 'Email Sent \n' while 1: GPIO.output(ready_LED, True) GPIO.output(uploading_LED, False) GPIO.output(stat_LED, False) if GPIO.input(in_flickr): #print "left" GPIO.output(flickr_LED, True) GPIO.output(both_LED, False) GPIO.output(hdd_LED, False) elif GPIO.input(in_hdd): #print "right" GPIO.output(flickr_LED, False) GPIO.output(both_LED, False) GPIO.output(hdd_LED, True) else: #print "mid" GPIO.output(flickr_LED, False) GPIO.output(both_LED, True) GPIO.output(hdd_LED, False) if GPIO.input(button): GPIO.output(uploading_LED, True) GPIO.output(ready_LED, False) print '======Start=====' print 'Mounting SD' time.sleep(1) global image_dir image_dir = '/mnt/SD/' os.system('mount -t vfat /dev/sda1/ ' + image_dir) print 'SD Mounted' if GPIO.input(in_flickr): flickr_upload() print 'SD Unmouting' time.sleep(10) os.system('umount -t vfat /dev/sda1/ ' + image_dir) print 'SD Unounted' print '======End======' GPIO.output(uploading_LED, False) GPIO.output(ready_LED, True) elif GPIO.input(in_hdd): hdd_upload() print 'SD Unmouting' time.sleep(10) os.system('umount -t vfat /dev/sda1/ ' + image_dir) print 'SD Unounted' print '======End======' GPIO.output(uploading_LED, False) GPIO.output(ready_LED, True) else: both_upload() print 'SD Unmouting' time.sleep(10) os.system('umount -t vfat /dev/sda1/ ' + image_dir) print 'SD Unounted' print '======End======' GPIO.output(uploading_LED, False) GPIO.output(ready_LED, True) |
Thanks for reading!
Okay! So I leave for college in less than 30 days, but I’d like to make sure my tomatoes to continue to grow once I leave so I’ve taken some steps to make sure that my departure goes smoothly.
Here’s a video of my revised setup:
There are a few key differences between this setup and my previous one:
The main one is that the watering system has been 100% re-vamped. The water distribution happens via a hose with holes in it instead of using the tray at the bottom of the plant grid in the previous video.
It also takes, uploads and tweets a picture of itself using a raspberry pi camera module.
It also creates a new mysql table every two weeks, and in turn, renders a new kind of graph. The renderscript.php file receives an argument from the python script which is the table code.
Here’s the python script:
|
1 2 3 4 5 6 7 8 9 10 11 12 13 14 15 16 17 18 19 20 21 22 23 24 25 26 27 28 29 30 31 32 33 34 35 36 37 38 39 40 41 42 43 44 45 46 47 48 49 50 51 52 53 54 55 56 57 58 59 60 61 62 63 64 65 66 67 68 69 70 71 72 73 74 75 76 77 78 79 80 81 82 83 84 85 86 87 88 89 90 91 92 93 94 95 96 97 98 99 100 101 102 103 104 105 106 107 108 109 110 111 112 113 114 115 116 117 118 119 120 121 122 123 124 125 126 127 128 129 130 131 132 133 134 135 136 137 138 139 140 141 142 143 144 145 146 147 148 149 150 151 152 153 154 155 156 157 158 159 160 161 162 163 164 165 166 167 168 169 170 171 172 173 174 175 176 177 178 179 180 181 182 183 184 185 186 187 188 189 190 191 192 193 194 195 196 197 198 199 200 201 202 203 204 205 206 207 208 209 210 211 212 213 214 215 216 217 218 219 220 221 222 223 224 225 226 227 228 229 230 231 232 233 234 235 236 237 238 239 240 241 242 243 244 245 246 247 248 249 250 251 252 253 254 255 256 257 258 259 260 261 262 |
#Timing setup from datetime import datetime from apscheduler.scheduler import Scheduler import time import datetime import sys import os now =datetime.datetime.now() #import logging #if you start getting logging errors, uncomment these two lines #logging.basicConfig() #GPIO setup import RPi.GPIO as GPIO GPIO.setmode(GPIO.BOARD) GPIO.cleanup() pin = 26 #pin for the adc GPIO.setup(pin, GPIO.OUT) NPNtrans = 3 #the pin for the npn transistor GPIO.setup(NPNtrans, GPIO.OUT) sampleLED = 5 #the indicator LED GPIO.setup(sampleLED, GPIO.OUT) pump = 7 #pin for the pump GPIO.setup(pump, GPIO.OUT) GPIO.output(pump, False) #the adc's SPI setup import spidev spi = spidev.SpiDev() spi.open(0, 0) #sets up the program's ability to write to a mysql database import MySQLdb con = MySQLdb.connect('localhost','piplanter_user','piplanter_pass','piplanter'); cursor = con.cursor() #tweepy setup, you must use the keys given to you when you create your app import tweepy consumer_key="" consumer_secret="" access_token="" access_token_secret="" #"logs in" to twitter, auth = tweepy.OAuthHandler(consumer_key, consumer_secret) auth.set_access_token(access_token, access_token_secret) api = tweepy.API(auth) #Flickr Setup import flickrapi api_key = '' api_secret = '' flickr = flickrapi.FlickrAPI(api_key, api_secret, format='json') (token, frob) = flickr.get_token_part_one(perms='write') if not token: raw_input("Press ENTER after you authorized this program") flickr.get_token_part_two((token, frob)) #Variable Setup ontime = 60 global table_number table_number = 0 #fuction that can read the adc def readadc(adcnum): # read SPI data from MCP3008 chip, 8 possible adc's (0 thru 7) if adcnum > 7 or adcnum < 0: return -1 r = spi.xfer2([1, 8 + adcnum << 4, 0]) adcout = ((r[1] & 3) << 8) + r[2] return adcout def water(): print "===== Starting Watering Process =====" GPIO.output(NPNtrans, True) GPIO.output(sampleLED, True) time.sleep(1) sensor1_before = readadc(0) sensor2_before = readadc(1) sensor3_before = readadc(2) sensor4_before = readadc(3) before = "WATERING START / Moisture Before - " + "Sensor 1:" + str(sensor1_before) + " Sensor 2:" + str(sensor2_before) + " Sensor 3:" + str(sensor3_before) + " Sensor 4:" + str(sensor4_before) + " - Average:" + str((float(sensor1_before+sensor2_before+sensor3_before+sensor4_before)/4)) api.update_status(before) print before GPIO.output(pump, True) time.sleep(ontime) GPIO.output(pump, False) time.sleep(60) #gives the water time to penetrate the soil sensor1_after = readadc(0) sensor2_after = readadc(1) sensor3_after = readadc(2) sensor4_after = readadc(3) after = "WATERING COMPLETED / Moisture After - " + "Sensor 1:" + str(sensor1_after) + " Sensor 2:" + str(sensor2_after) + " Sensor 3:" + str(sensor3_after) + " Sensor 4:" + str(sensor4_after) + " - Average: " + str((float(sensor1_after+sensor2_after+sensor3_after+sensor4_after)/4)) api.update_status(after) print after GPIO.output(NPNtrans, False) GPIO.output(sampleLED, False) print "====== Watering Process Complete =====" def hourlyUpdate(): GPIO.output(pump, False) print "----------start----------\n" GPIO.output(NPNtrans, True) GPIO.output(sampleLED, True) time.sleep(1) sampleTime = time.ctime() mst1 = 1024-readadc(0) mst2 = 1024-readadc(1) mst3 = 1024-readadc(2) mst4 = 1024-readadc(3) pot1 = readadc(4) ldr1 = readadc(5) millivolts = readadc(6)*(3300.0/1024.0) temp_c = ((millivolts - 100.0)/10)-40.0 tmp1 = (temp_c * 9.0 / 5.0) + 32 print 'Polling Probes \n' #prints debug info to console print sampleTime,"|","MST1:",mst1,"MST2:",mst2,"MST3:",mst3,"MST4:",mst4,"Pot1:",pot1,"LDR1:",ldr1,"TMP1:",tmp1 #prints the debug info global table_number print 'Adding Data To Table: ' + str(table_number) #adds the data to the mysql table global table_number cursor.execute('INSERT INTO piplanter_table_'+ table_code +'(Time,mst1_V,mst2_V,mst3_V,mst4_V,pot1_V,ldr1_V,tmp1_F) VALUES(%s,%s,%s,%s,%s,%s,%s,%s)',(sampleTime,mst1,mst2,mst3,mst4,pot1,ldr1,tmp1)) con.commit() #this is important for live updating GPIO.output(NPNtrans, False) #turns the probes off print 'Data Collected, Disengaging Probes \n' #takes a picture of the plants print 'Taking Picture with Raspberry Pi Camera Board' picture_dir = '/home/pi/documents/piplanter/images/' os.system('raspistill -o ' + picture_dir + str(time.strftime('%m-%d-%y_%H-%M-%S')) + '.jpg') print 'Capture Successfull: ' + picture_dir + str(time.strftime('%m-%d-%y_%H-%M-%S')) + '.jpg' #finds the newest image in the directory print '\nUploading Picture To Flickr' picture_allfiles = sorted(os.listdir(picture_dir), key=lambda p: os.path.getctime(os.path.join(picture_dir, p))) picture_newest = picture_dir+picture_allfiles[-1] print 'File for upload: ' + picture_newest #prints location and file to console #uploads the picture of the plants to flickr picture_title = 'Picture @ ' + str(sampleTime) picture_response = flickr.upload(filename=picture_newest, title=picture_title, format='etree') #uploads the file to flickr picture_photoID = picture_response.find('photoid').text #gets the id of the photo for constructing a url print 'Picture Upload Successful, Photo ID: ' + picture_photoID + '\n' #more debug info time.sleep(10) #renders the image of the graph print "Graph Render Start" global table_code os.system('php /opt/bitnami/apps/wordpress/htdocs/piplanter/renderScript.php ' + table_code ) #renders the .png file print "Graph Render Complete \n" #finds the newest image in the directory print 'Uploading Graph To Flickr' graph_allfiles = sorted(os.listdir('/opt/bitnami/apps/wordpress/htdocs/piplanter/renders/'), key=lambda p: os.path.getctime(os.path.join('/opt/bitnami/apps/wordpress/htdocs/piplanter/renders/', p))) graph_newest = '/opt/bitnami/apps/wordpress/htdocs/piplanter/renders/'+graph_allfiles[-1] print 'File for upload: ' + graph_newest #prints location and file to console graph_title = 'Graph @ ' + str(sampleTime) graph_response = flickr.upload(filename=graph_newest, title=graph_title, format='etree') #uploads the file to flickr graph_photoID = graph_response.find('photoid').text #gets the id of the photo for constructing a url print 'Graph Upload Successful, Photo ID: ' + graph_photoID + '\n' #more debug info #tweets the images and data send = 'Brghtnss: ' + str(format((((float(ldr1)/1024)*100)),'.0f')) + '% / ' + 'Tmprtr: ' + str(format(tmp1,'.0f')) + ' Dg F' + ' / Avg Plnt Moisture: '+ str(format(float((float((mst1+mst2+mst3+mst4)/4)/1024)*100),'.0f')) + '%' + ' Graph: ' + 'http://www.flickr.com/photos/97350286@N08/'+ str(graph_photoID) + ' Pic: ' + 'http://www.flickr.com/photos/97350286@N08/' + str(picture_photoID) #builds the text of the tweet print "Tweeting:" , send #for debug purposes api.update_status(send) #tweets the tweet time.sleep(.1) GPIO.output(sampleLED, False) print "\n-----------end-----------" def table_update(): global table_number table_number = table_number + 1 global table_code table_code = str(time.strftime('%m_%d_%y_%H_%M_%S')) + '__' + str(table_number) print 'Creating Table: ' + table_code cursor.execute('USE piplanter') con.commit() cursor.execute('CREATE TABLE piplanter_table_'+ table_code +'(Sample_Number INT NOT NULL AUTO_INCREMENT PRIMARY KEY, Time VARCHAR(100), mst1_V VARCHAR(100), mst2_V VARCHAR(100), mst3_V VARCHAR(100), mst4_V VARCHAR(100), pot1_V VARCHAR(100), ldr1_V VARCHAR(100), tmp1_F VARCHAR(100) );') con.commit() table_update() hourlyUpdate() scheduler = Scheduler(standalone=True) scheduler.add_interval_job(hourlyUpdate, hours=1) scheduler.add_interval_job(water, days=1) scheduler.add_interval_job(table_update, weeks=2) scheduler.start() #runs the program indefianately once every hour |
Here’s the .php script:
|
1 2 3 4 5 6 7 8 9 10 11 12 13 14 15 16 17 18 19 20 21 22 23 24 25 26 27 28 29 30 31 32 33 34 35 36 37 38 39 40 41 42 43 44 45 46 47 48 49 50 51 52 53 54 55 56 57 58 59 60 61 62 63 64 65 66 67 68 69 70 71 72 73 74 75 76 77 78 79 80 81 82 83 84 85 86 |
<?php /* Include all the classes */ include("/srv/www/lib/pChart/class/pData.class.php"); include("/srv/www/lib/pChart/class/pDraw.class.php"); include("/srv/www/lib/pChart/class/pImage.class.php"); $myData = new pData(); /* Create your dataset object */ $db = mysql_connect("localhost", "piplanter_user", "piplanter_pass"); //location of server, db username, db pass mysql_select_db("piplanter", $db); $Requete = "SELECT * FROM `piplanter_table_" . $argv[1] . "`"; //table name $Result = mysql_query($Requete, $db); /*This fetches the data from the mysql database, and adds it to pchart as points*/ while($row = mysql_fetch_array($Result)) { $Time = $row["Time"]; $myData->addPoints($Time,"Time"); $mst1_V = $row["mst1_V"]; $myData->addPoints($mst1_V,"mst1_V"); $mst2_V = $row["mst2_V"]; $myData->addPoints($mst2_V,"mst2_V"); $mst3_V = $row["mst3_V"]; $myData->addPoints($mst3_V,"mst3_V"); $mst4_V = $row["mst4_V"]; $myData->addPoints($mst4_V,"mst4_V"); $ldr1_V = $row["ldr1_V"]; $myData->addPoints($ldr1_V,"ldr1_V"); $tmp1_F = $row["tmp1_F"]; $myData->addPoints($tmp1_F,"tmp1_F"); } $myData-> setSerieOnAxis("tmp1_F", 0); //assigns the data to the frist axis $myData-> setAxisName(0, "Degrees F"); //adds the label to the first axis $myData-> setSerieOnAxis("ldr1_V", 1); $myData-> setAxisName(1, "LDR"); $myData-> setSerieOnAxis("mst1_V", 2); $myData-> setSerieWeight("mst1_V",2); $myData-> setSerieOnAxis("mst2_V", 2); $myData-> setSerieOnAxis("mst3_V", 2); $myData-> setSerieOnAxis("mst4_V", 2); $myData-> setAxisName(2, "Relative Moisture"); $myData->setAbscissa("Time"); //sets the time data set as the x axis label $myData-> setSerieWeight("mst1_V",1); //draws the line tickness $myData->setPalette("mst1_V",array("R"=>58,"G"=>95,"B"=>205,"Alpha"=>80)); //sets the line color $myData-> setSerieWeight("mst2_V",1); $myData->setPalette("mst2_V",array("R"=>39,"G"=>64,"B"=>139,"Alpha"=>80)); $myData-> setSerieWeight("mst3_V",1); $myData->setPalette("mst3_V",array("R"=>0,"G"=>34,"B"=>102,"Alpha"=>80)); $myData-> setSerieWeight("mst4_V",1); $myData->setPalette("mst4_V",array("R"=>67,"G"=>110,"B"=>238,"Alpha"=>80)); $myData-> setSerieWeight("ldr1_V",2); $myData-> setSerieTicks("ldr1_V", 4); $myData-> setSerieWeight("tmp1_F",2); $myData-> setSerieTicks("tmp1_F", 4); $myPicture = new pImage(4000,500,$myData); /* Create a pChart object and associate your dataset */ $myPicture->setFontProperties(array("FontName"=>"/srv/www/lib/pChart/fonts/pf_arma_five.ttf","FontSize"=>6)); /* Choose a nice font */ $myPicture->setGraphArea(130,40,3900,300); /* Define the boundaries of the graph area */ $myPicture->drawScale(array("LabelRotation"=>320)); /* Draw the scale, keep everything automatic */ $Settings = array("R"=>250, "G"=>250, "B"=>250, "Dash"=>1, "DashR"=>0, "DashG"=>0, "DashB"=>0); /*The combination makes a cool looking graph*/ $myPicture->drawPlotChart(array("DisplayValues"=>TRUE)); $myPicture->drawLineChart(); $myPicture->drawLegend(30,320); //adds the legend //$date-> date("d-M-Y:H:i:s"); //$myPicture->autoOutput(); /* Build the PNG file and send it to the web browser */ $myPicture->render("/opt/bitnami/apps/wordpress/htdocs/piplanter/renders/".date("d-M-Y_H:i:s").".png"); ?> |
Thank you for reading!
So I’ve decided that it doesn’t make sense for me to make little tiny posts on here, so I’ve migrated my thoughts on development to twitter at: www.twitter.com/eso_logic
This program can now handle mounting and unmounting the SD card on /mnt/SD (you will have to make that dir with root privileges)
|
1 2 3 4 5 6 7 8 9 10 11 12 13 14 15 16 17 18 19 20 21 22 23 24 25 26 27 28 29 30 31 32 33 34 35 36 37 38 39 40 41 42 43 44 45 46 47 48 49 50 51 52 53 54 55 56 57 58 59 60 61 62 63 64 65 66 67 68 69 70 71 72 73 74 75 76 77 78 79 80 81 82 83 84 85 86 87 88 89 90 91 92 93 94 95 96 97 98 99 100 101 102 103 104 105 106 107 108 109 110 111 112 113 114 115 116 117 118 119 120 121 122 123 124 125 126 127 128 129 130 131 132 133 134 135 136 137 138 139 140 141 142 143 144 145 146 147 148 149 150 151 152 153 154 155 156 157 158 159 160 161 162 163 164 165 166 167 168 |
#time setup import time #GPIO setup import RPi.GPIO as GPIO GPIO.setmode(GPIO.BOARD) in_left = 11 GPIO.setup(in_left, GPIO.IN) in_right = 13 GPIO.setup(in_right, GPIO.IN) button = 16 GPIO.setup(button, GPIO.IN) flickr_LED = 3 GPIO.setup(flickr_LED, GPIO.OUT) both_LED = 5 GPIO.setup(both_LED, GPIO.OUT) hdd_LED = 7 GPIO.setup(hdd_LED, GPIO.OUT) uploading_LED = 26 GPIO.setup(uploading_LED, GPIO.OUT) ready_LED = 24 GPIO.setup(ready_LED, GPIO.OUT) stat_LED = 22 GPIO.setup(stat_LED, GPIO.OUT) #for the cp command import os import os.path #setup for datestamping folders import time #Flickr Setup import flickrapi api_key = api_secret = flickr = flickrapi.FlickrAPI(api_key, api_secret, format='json') (token, frob) = flickr.get_token_part_one(perms='write') if not token: raw_input("Press ENTER after you authorized this program") flickr.get_token_part_two((token, frob)) #Storage Locations sdcard = '/mnt/SD' destination = '/media/usb0/' #these functions will be filled later, but right now it's just a simple led blink def flickr_upload(): print "Uploading Photos To Flickr" flickr_number = 0 flickr_upload_list = [] for path, subdirs, files in os.walk(sdcard): for filename in files: listfiles = os.path.join(path, filename) upload_response = flickr.upload(filename = listfiles, format='etree') upload_ID = upload_response.find('photoid').text flickr_upload_list.insert(flickr_number,upload_ID) print 'Photo ' + str(flickr_number) + ' uploaded' + ' ID: ' + upload_ID + ' : ' + str(flickr_upload_list[flickr_number]) flickr_number = flickr_number + 1 set_name = 'Uploaded At ' + time.strftime('%m-%d-%y_%H-%M-%S') print 'Creating Set: ' + set_name json_string = flickr.photosets_create(title=set_name, primary_photo_id=flickr_upload_list[0]) set_id = json_string.split('"')[5] print 'Set Created: ' + set_id print 'Adding Files To list' for s in flickr_upload_list: flickr.photosets_addPhoto(photoset_id=set_id, photo_id=s) print 'Photo: ' + s + ' Added To Set: ' + set_id print "Flickr Upload Completed" def hdd_upload(): print "Uploading Photos To the HDD" GPIO.output(uploading_LED, True) GPIO.output(ready_LED, False) print 'Creating Folder' foldername = time.strftime('%m-%d-%y_%H-%M-%S') os.system('mkdir ' + destination + foldername) print 'Folder Created: ' + destination + foldername hdd_number = 0 for path, subdirs, files in os.walk(sdcard): for filename in files: hdd_number = hdd_number + 1 listfiles = os.path.join(path, filename) print 'Copying File: ' + str(number) + ' ' + listfiles command = 'cp ' + listfiles + ' ' + destination + foldername print command os.system(command) print "HDD Upload Completed" GPIO.output(uploading_LED, False) GPIO.output(ready_LED, True) time.sleep(2) def both_upload(): print "Uploading Photos To Flickr and the HDD" hdd_upload() flickr_upload() print "Double Upload Completed" while 1: GPIO.output(ready_LED, True) GPIO.output(uploading_LED, False) GPIO.output(stat_LED, False) if GPIO.input(in_left): #print "left" GPIO.output(flickr_LED, True) GPIO.output(both_LED, False) GPIO.output(hdd_LED, False) elif GPIO.input(in_right): #print "right" GPIO.output(flickr_LED, False) GPIO.output(both_LED, False) GPIO.output(hdd_LED, True) else: #print "mid" GPIO.output(flickr_LED, False) GPIO.output(both_LED, True) GPIO.output(hdd_LED, False) if GPIO.input(button): GPIO.output(uploading_LED, True) GPIO.output(ready_LED, False) time.sleep(10) os.system('mount -t vfat /dev/sda1/ ' + sdcard) print 'SD Mounted' if GPIO.input(in_left): flickr_upload() time.sleep(10) os.system('umount -t vfat /dev/sda1/ ' + sdcard) print 'SD Unounted' GPIO.output(uploading_LED, False) GPIO.output(ready_LED, True) elif GPIO.input(in_right): hdd_upload() time.sleep(10) os.system('umount -t vfat /dev/sda1/ ' + sdcard) print 'SD Unounted' GPIO.output(uploading_LED, False) GPIO.output(ready_LED, True) else: both_upload() time.sleep(10) os.system('umount -t vfat /dev/sda1/ ' + sdcard) print 'SD Unounted' GPIO.output(uploading_LED, False) GPIO.output(ready_LED, True) |
Here’s a video!
So now, when in Flickr Upload mode, the program will:
1. Walk through all Sub-Directories and find every image file
2. Upload all of those photos to Flickr
3. Get the photo ID’s of each of those photos and then index them into a list
4. Use that list to create a Photoset (Flickr’s equivalent of a Photo Album) named after the time the photos were uploaded.
As I said in the video, I want eventually (if the weather stays this bad, tomorrow) add email functionality to the program so it will send the user an email when all of the photos have been uploaded / the set of those photos.
Here’s the source used in the video:
|
1 2 3 4 5 6 7 8 9 10 11 12 13 14 15 16 17 18 19 20 21 22 23 24 25 26 27 28 29 30 31 32 33 34 35 36 37 38 39 40 41 42 43 44 45 46 47 48 49 50 51 52 53 54 55 56 57 58 59 60 61 62 63 64 65 66 67 68 69 70 71 72 73 74 75 76 77 78 79 80 81 82 83 84 85 86 87 88 89 90 91 92 93 94 95 96 97 98 99 100 101 102 103 104 105 106 107 108 109 110 111 112 113 114 115 116 117 118 119 120 121 122 123 124 125 126 127 128 129 130 131 132 133 134 135 136 137 138 139 140 141 142 143 144 145 146 147 148 149 150 151 152 153 154 155 156 157 158 159 |
#time setup import time #GPIO setup import RPi.GPIO as GPIO GPIO.setmode(GPIO.BOARD) in_left = 11 GPIO.setup(in_left, GPIO.IN) in_right = 13 GPIO.setup(in_right, GPIO.IN) button = 16 GPIO.setup(button, GPIO.IN) flickr_LED = 3 GPIO.setup(flickr_LED, GPIO.OUT) both_LED = 5 GPIO.setup(both_LED, GPIO.OUT) hdd_LED = 7 GPIO.setup(hdd_LED, GPIO.OUT) uploading_LED = 26 GPIO.setup(uploading_LED, GPIO.OUT) ready_LED = 24 GPIO.setup(ready_LED, GPIO.OUT) stat_LED = 22 GPIO.setup(stat_LED, GPIO.OUT) #for the cp command import os import os.path #setup for datestamping folders import time #Flickr Setup import flickrapi api_key = '2bfb7e8be01e5f9f37e2e140076c6efa' api_secret = 'fb4295ce55e7e0dd' flickr = flickrapi.FlickrAPI(api_key, api_secret, format='json') (token, frob) = flickr.get_token_part_one(perms='write') if not token: raw_input("Press ENTER after you authorized this program") flickr.get_token_part_two((token, frob)) #Storage Locations sdcard = '/media/usb0/' destination = '/media/usb0/' #these functions will be filled later, but right now it's just a simple led blink def flickr_upload(): print "Uploading Photos To Flickr" GPIO.output(uploading_LED, True) GPIO.output(ready_LED, False) flickr_number = 0 flickr_upload_list = [] for path, subdirs, files in os.walk(sdcard): for filename in files: listfiles = os.path.join(path, filename) upload_response = flickr.upload(filename = listfiles, format='etree') upload_ID = upload_response.find('photoid').text flickr_upload_list.insert(flickr_number,upload_ID) print 'Photo ' + str(flickr_number) + ' uploaded' + ' ID: ' + upload_ID + ' : ' + str(flickr_upload_list[flickr_number]) flickr_number = flickr_number + 1 set_name = 'Uploaded At ' + time.strftime('%m-%d-%y_%H-%M-%S') print 'Creating Set: ' + set_name json_string = flickr.photosets_create(title=set_name, primary_photo_id=flickr_upload_list[0]) set_id = json_string.split('"')[5] print 'Set Created: ' + set_id print 'Adding Files To list' for s in flickr_upload_list: flickr.photosets_addPhoto(photoset_id=set_id, photo_id=s) print 'Photo: ' + s + ' Added To Set: ' + set_id print "Flickr Upload Completed" GPIO.output(uploading_LED, False) GPIO.output(ready_LED, True) def hdd_upload(): print "Uploading Photos To the HDD" GPIO.output(uploading_LED, True) GPIO.output(ready_LED, False) print 'Creating Folder' foldername = time.strftime('%m-%d-%y_%H-%M-%S') os.system('mkdir ' + destination + foldername) print 'Folder Created: ' + destination + foldername hdd_number = 0 for path, subdirs, files in os.walk(sdcard): for filename in files: hdd_number = hdd_number + 1 listfiles = os.path.join(path, filename) print 'Copying File: ' + str(number) + ' ' + listfiles command = 'cp ' + listfiles + ' ' + destination + foldername print command os.system(command) print "HDD Upload Completed" GPIO.output(uploading_LED, False) GPIO.output(ready_LED, True) time.sleep(2) def both_upload(): print "Uploading Photos To Flickr and the HDD" GPIO.output(uploading_LED, True) GPIO.output(ready_LED, False) hdd_upload() flickr_upload() print "Double Upload Completed" GPIO.output(uploading_LED, False) GPIO.output(ready_LED, True) while 1: GPIO.output(ready_LED, True) GPIO.output(uploading_LED, False) GPIO.output(stat_LED, False) if GPIO.input(in_left): #print "left" GPIO.output(flickr_LED, True) GPIO.output(both_LED, False) GPIO.output(hdd_LED, False) elif GPIO.input(in_right): #print "right" GPIO.output(flickr_LED, False) GPIO.output(both_LED, False) GPIO.output(hdd_LED, True) else: #print "mid" GPIO.output(flickr_LED, False) GPIO.output(both_LED, True) GPIO.output(hdd_LED, False) if GPIO.input(button): if GPIO.input(in_left): flickr_upload() elif GPIO.input(in_right): hdd_upload() else: both_upload() |