Looking for a wall mounted version of the HMD mount? Check out this remix on thingiverse (thanks Sean)!
Here’s a video going over the design:
The printed parts can all be found on thingiverse here. Please let me know if you use any of these! I’d love to talk about potential improvements that could be made.
For fastening hardware, everything is available on McMaster:
- M3 x 25mm: https://www.mcmaster.com/91292A020
- M3 Washer: https://www.mcmaster.com/93475A210
- M3 Nut: https://www.mcmaster.com/91828a211
- M3 Headed insert: https://www.mcmaster.com/94180a331
This is most likely the shelf at the center of the design: https://www.walmart.com/ip/Work-Choice-5-Tier-Commercial-Wire-Shelving-Rack-Zinc/44425506. I purchased it years and years ago, so things about the design could have changed. In any case, the pole hooks could be redesigned to fit almost any shelf.
Valve has done an amazing thing by publishing these files to GitHub for all of us to use. The existence of these files informed my decision to go with the index more than any of the technical specifications did. You should go star the repo if you enjoyed this video to show that Valve is doing a good thing by publishing these designs. The repo is here: https://github.com/ValveSoftware/IndexHardware
Here are some more photos showing additional angles of the printed parts:
This is the transcript used in the video. Thanks for reading:
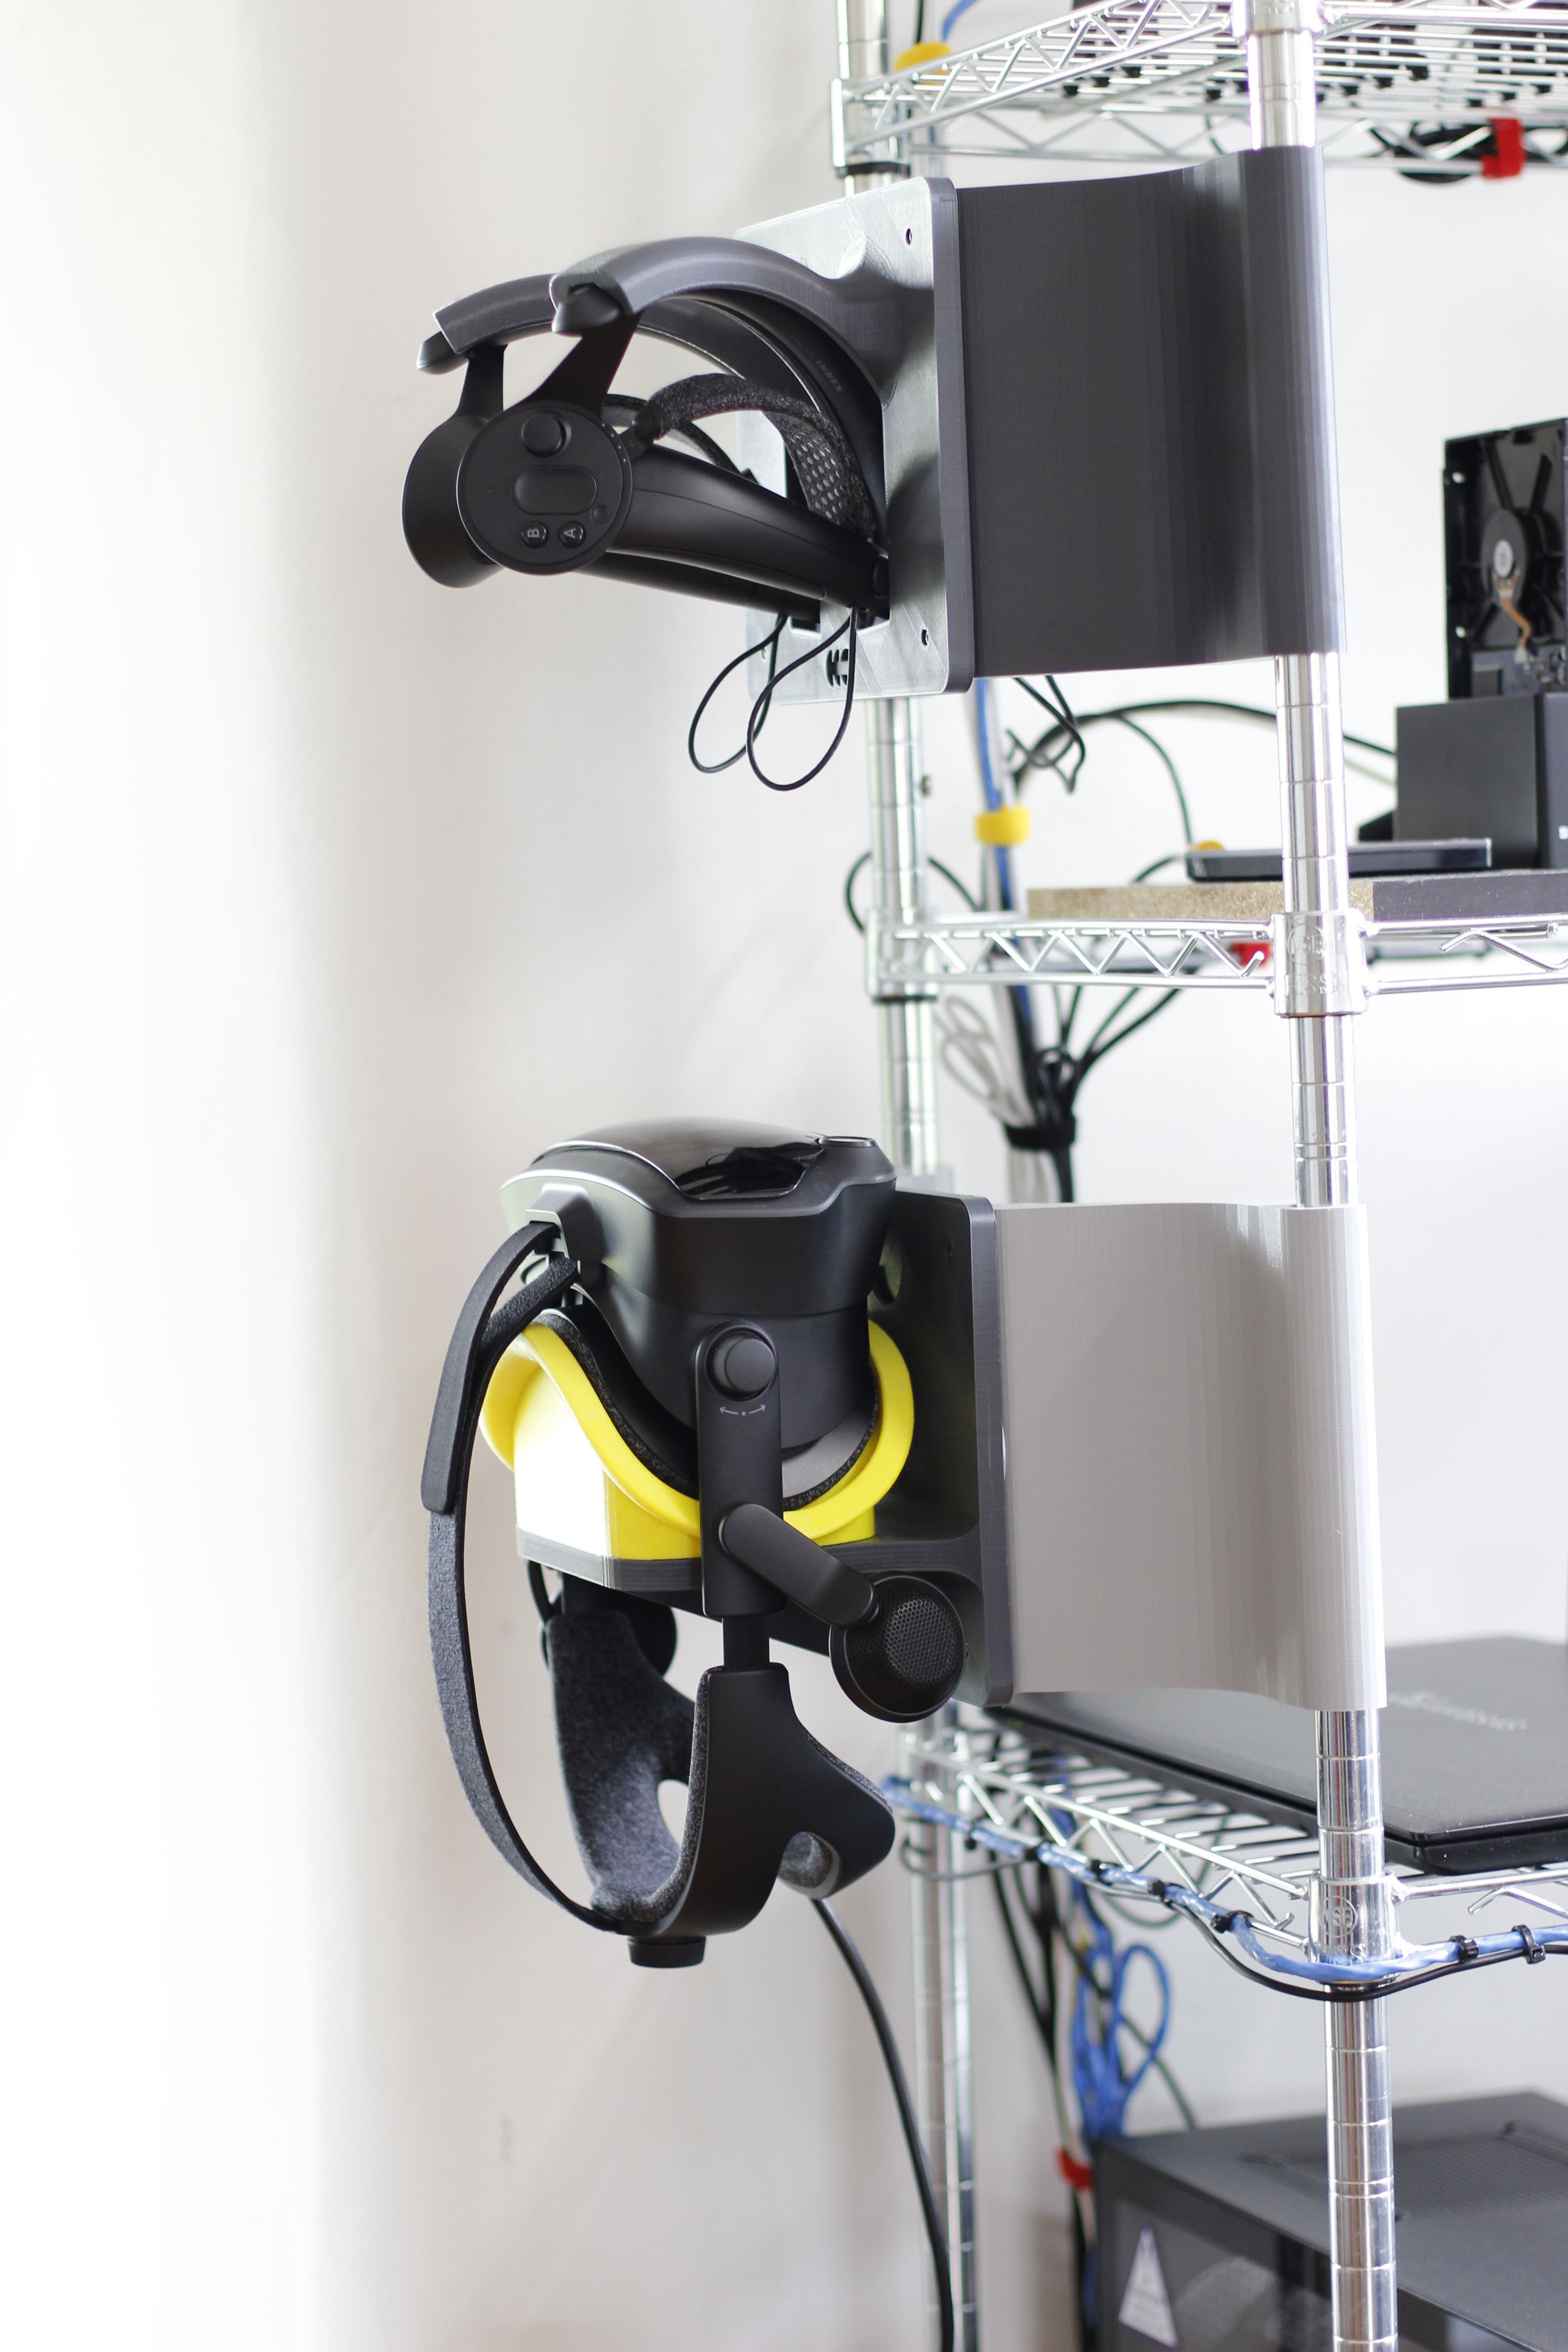
Here’s my 3D printed solution for storing a Valve Index on a wire shelf.
It features:
- A charging station for the knuckles.
- Uniform support for the HMD that also protects against light damage without using lens covers.
- A very sophisticated cable bucket
- And strain relief for the connection between the HMD and my graphics card.
And is all way-way-way over-engineered.
The purpose of this video is to run through the design highlights for each of these components, but if you’re just interested in the CAD files there’s a link to a blog post with all of that and more in the description of this video.
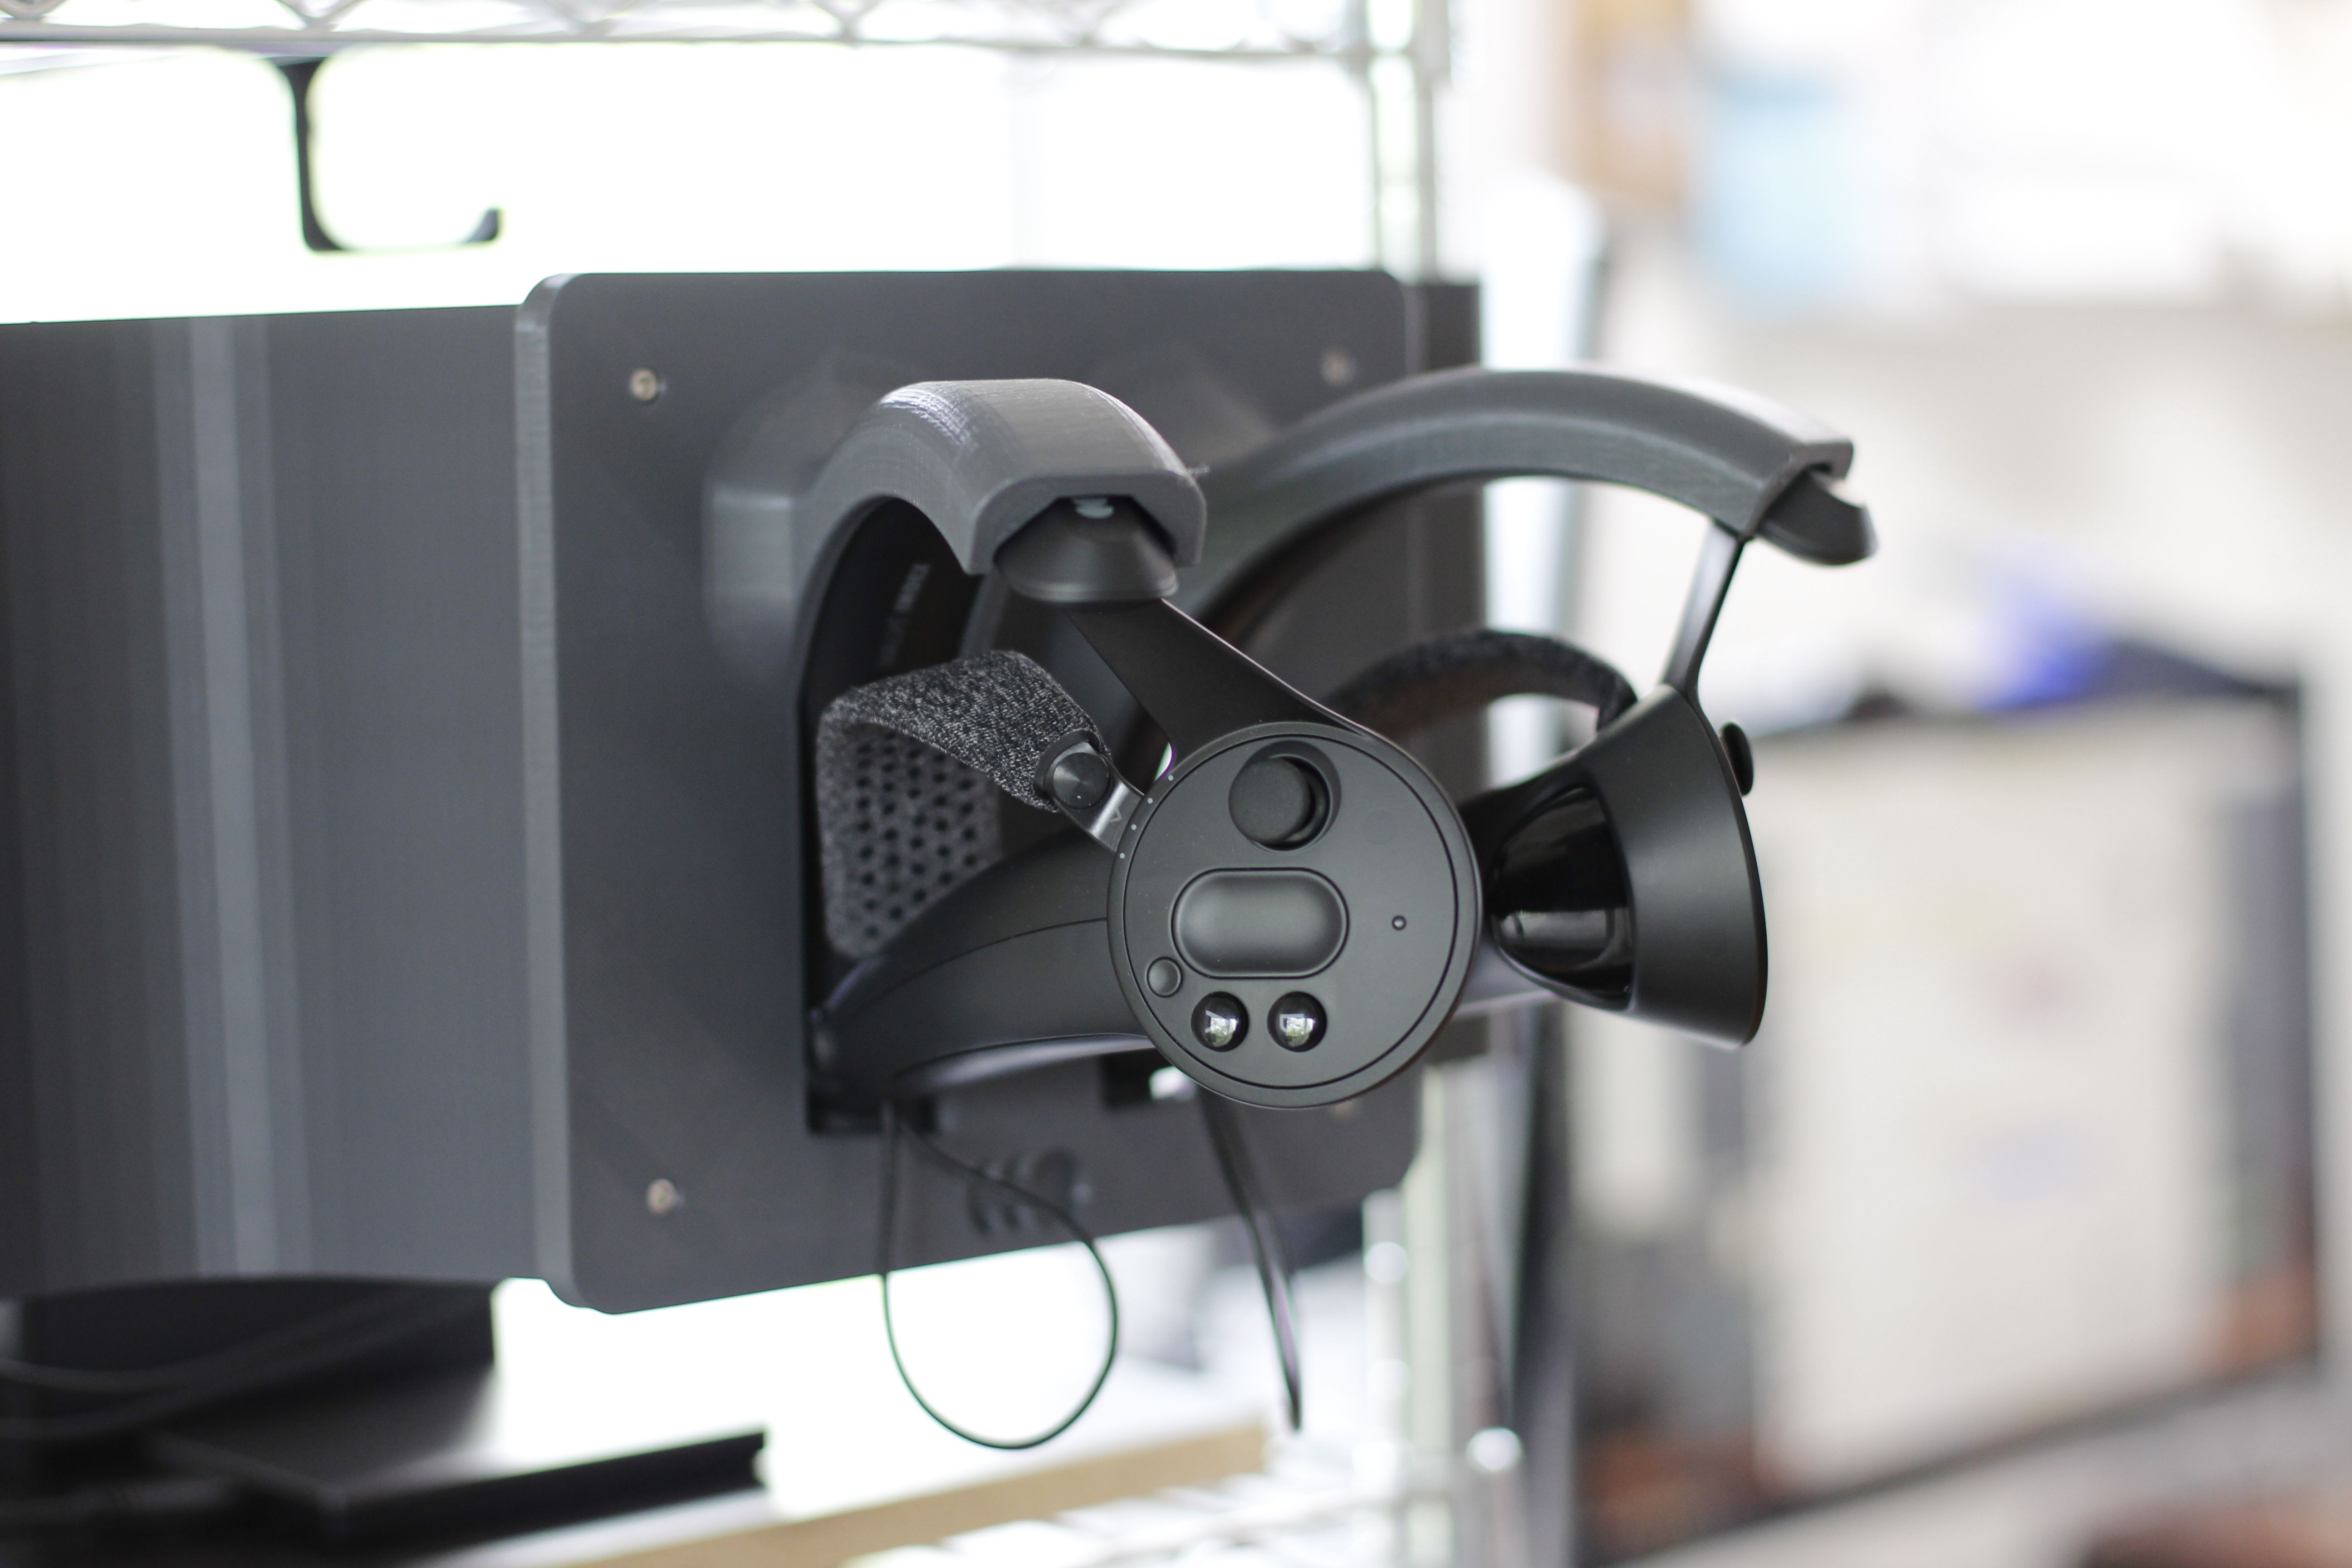
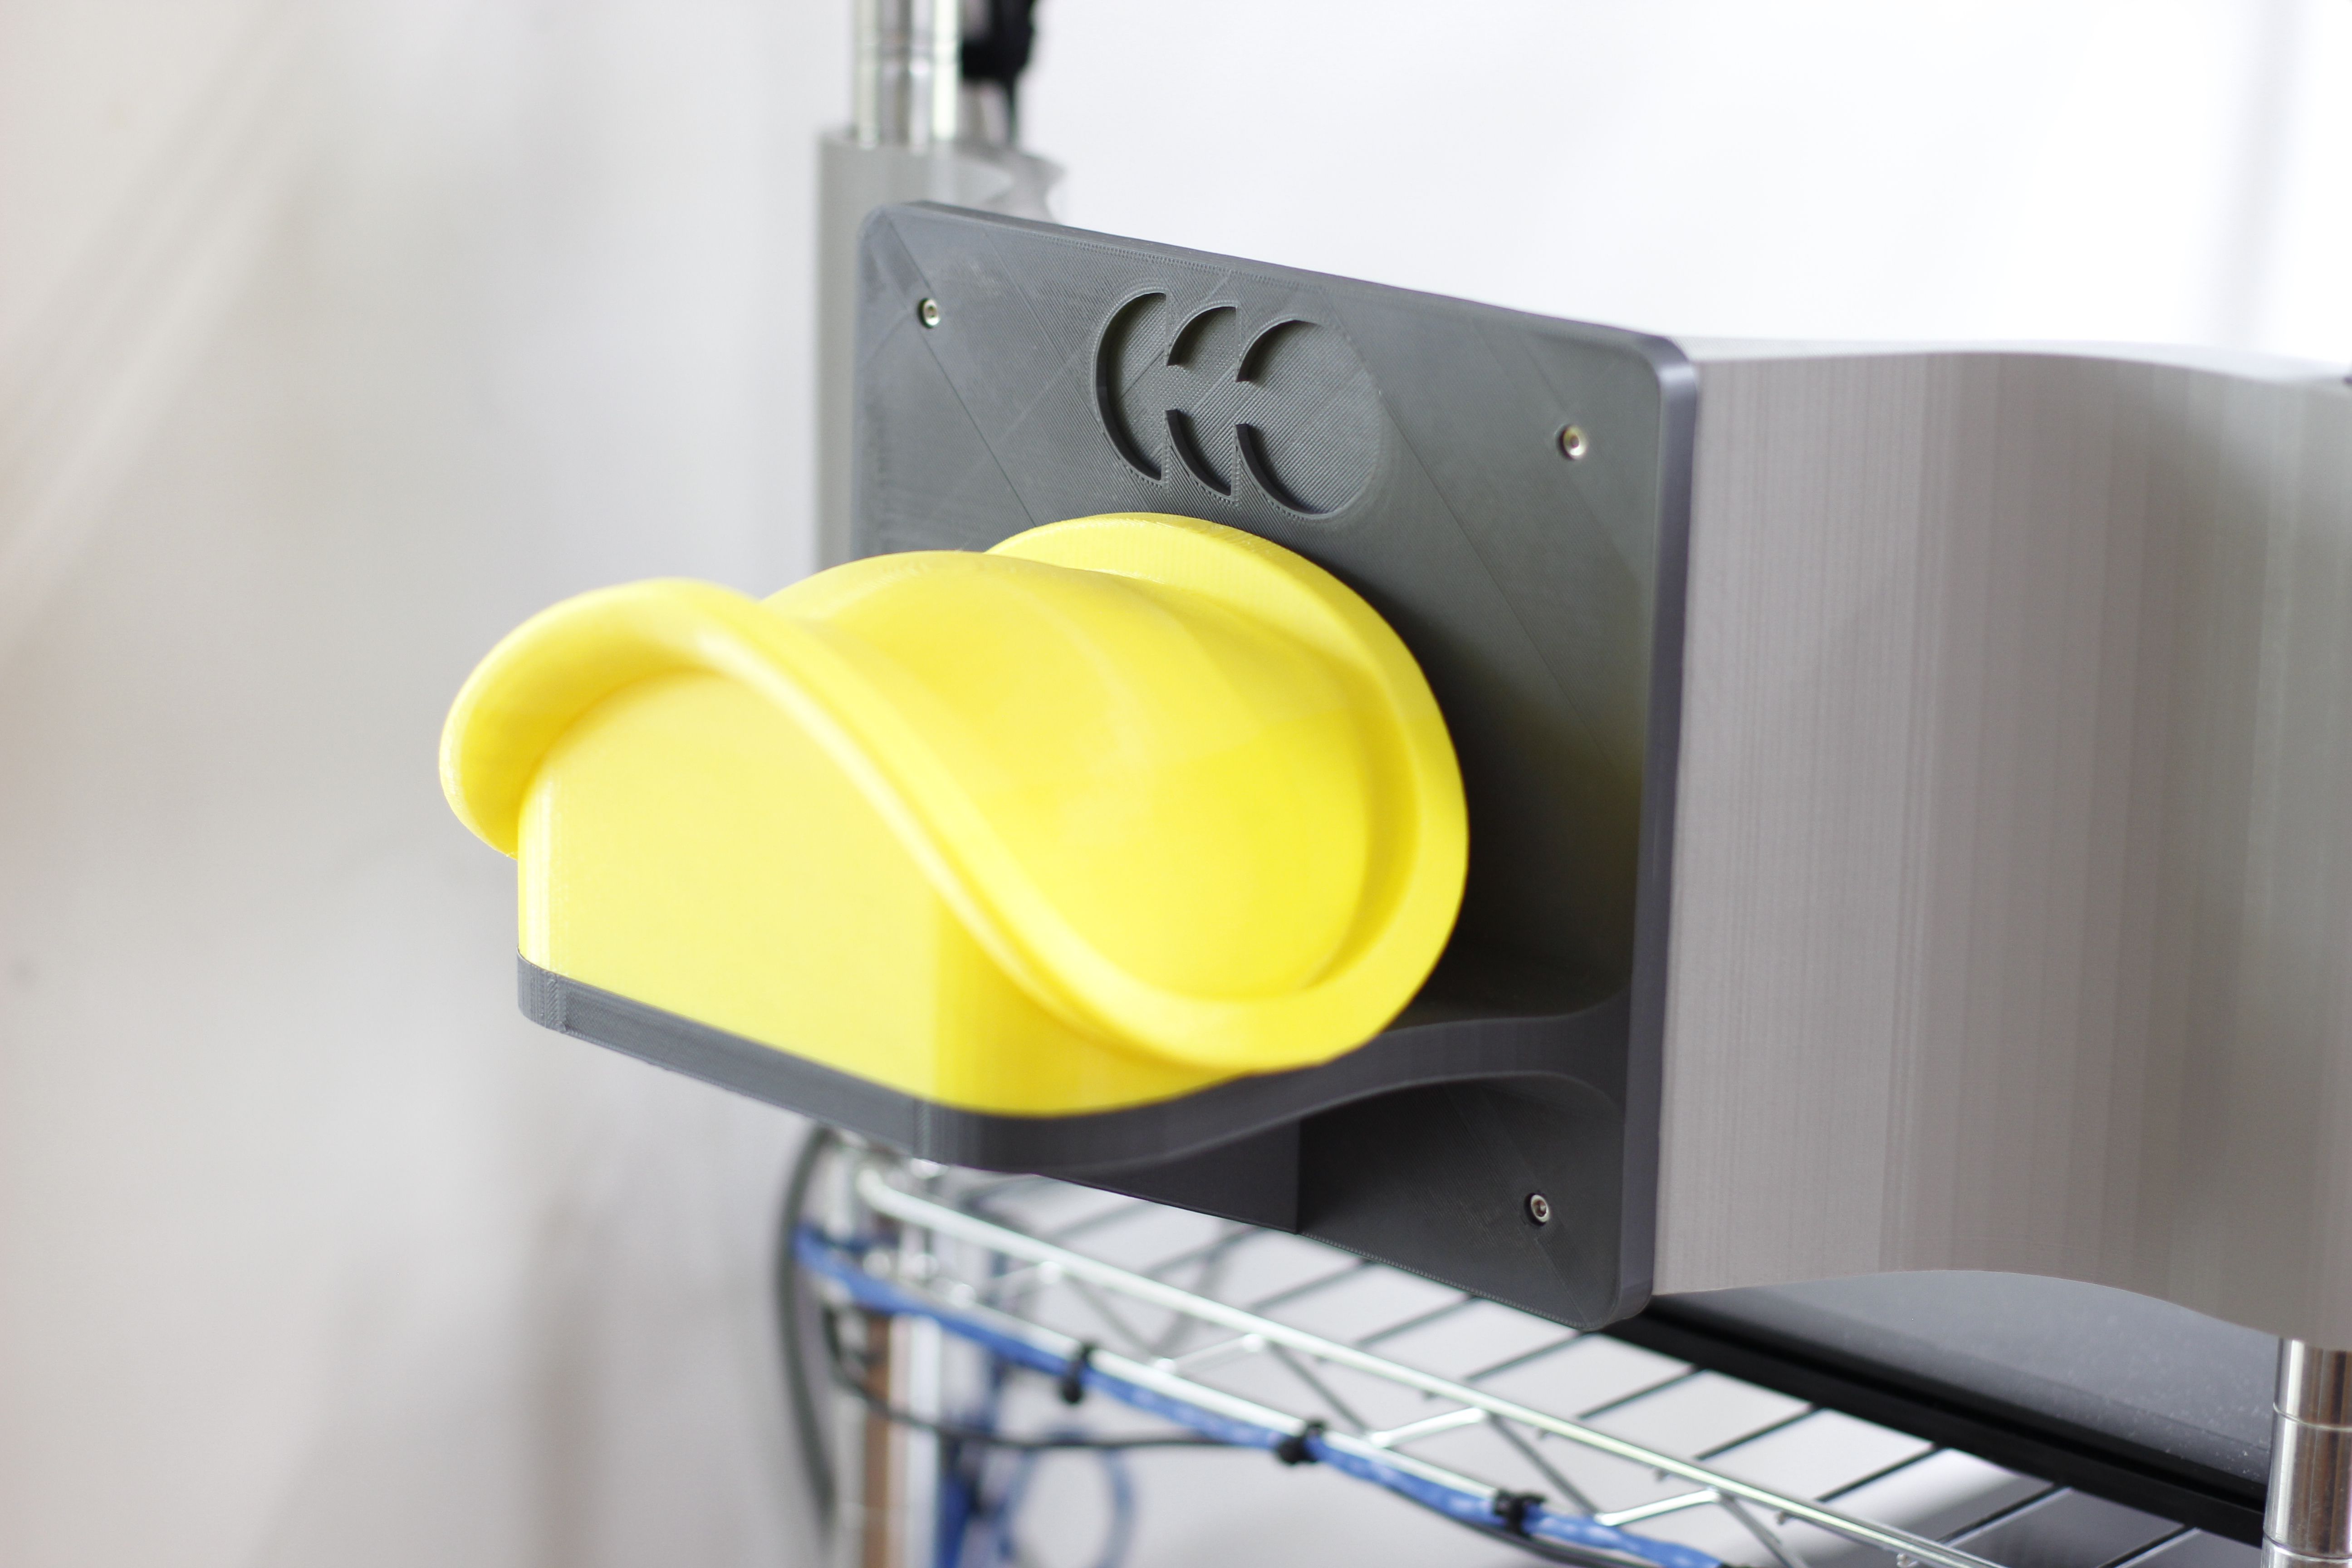
Right… Let’s start with the HMD mount.
As I record this, the model that Valve published on GitHub was for the plastic piece that mates to the head mounted display, it did not include the cushion that sits on the user’s face.
Reason being is because the cushion piece is probably what Valve anticipates people wanting to re-design. So, for 99% of the reasons why you’d want this model in the first place, this is totally adequate. But in this case, trying to model an inverted version of the foam piece, there was a lot of guesswork involved, hundreds of hours of print time worth of guesswork.
Even once it was clear that the HMD was fitting correctly, it didn’t really “slot” into place the way it fits on my head.
That’s what the purpose of the “bubble” across the middle is. When loaded, the cushion material collects around the base of the bubble forcing a more concentric mate.
If you’re considering working on a project like I urge you to just copy this geometry. It’s really tough to get the feel of this part right.
The shelf part was much easier, I don’t know if I love the look of the ribs but they were quick to print and will be able to easily support the load over time.
The two components are held together with threaded inserts and m3 machine screws.
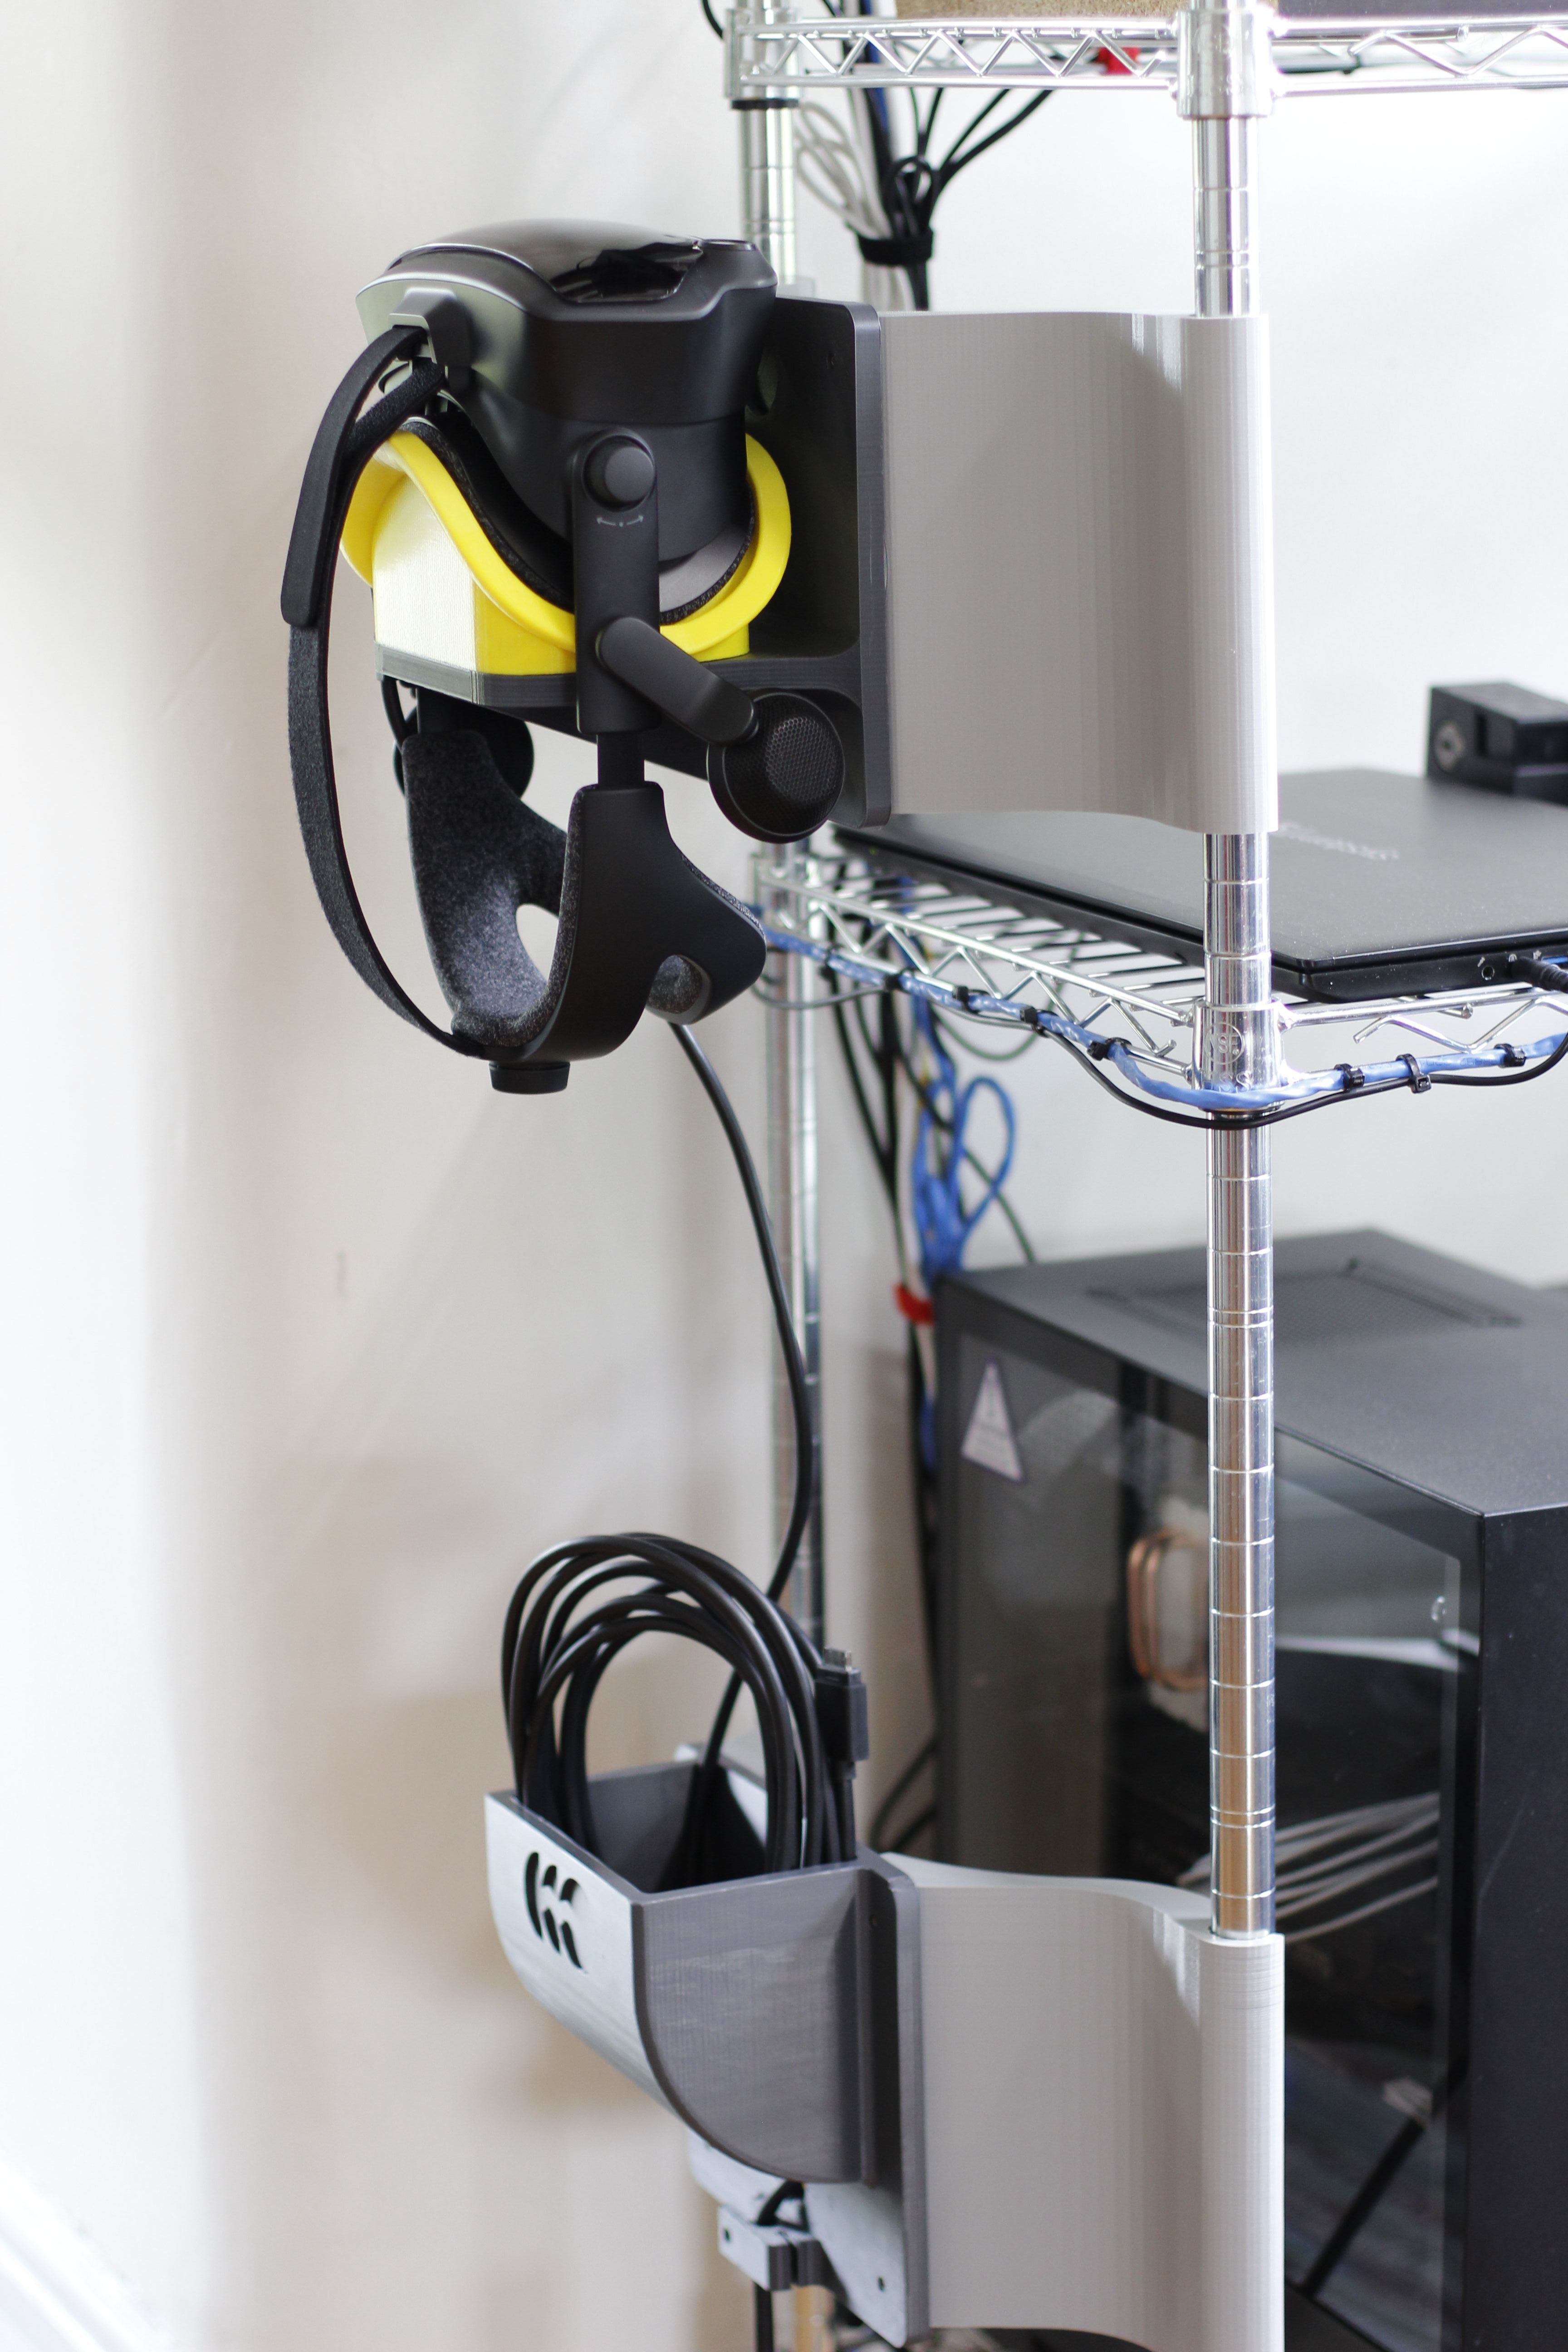
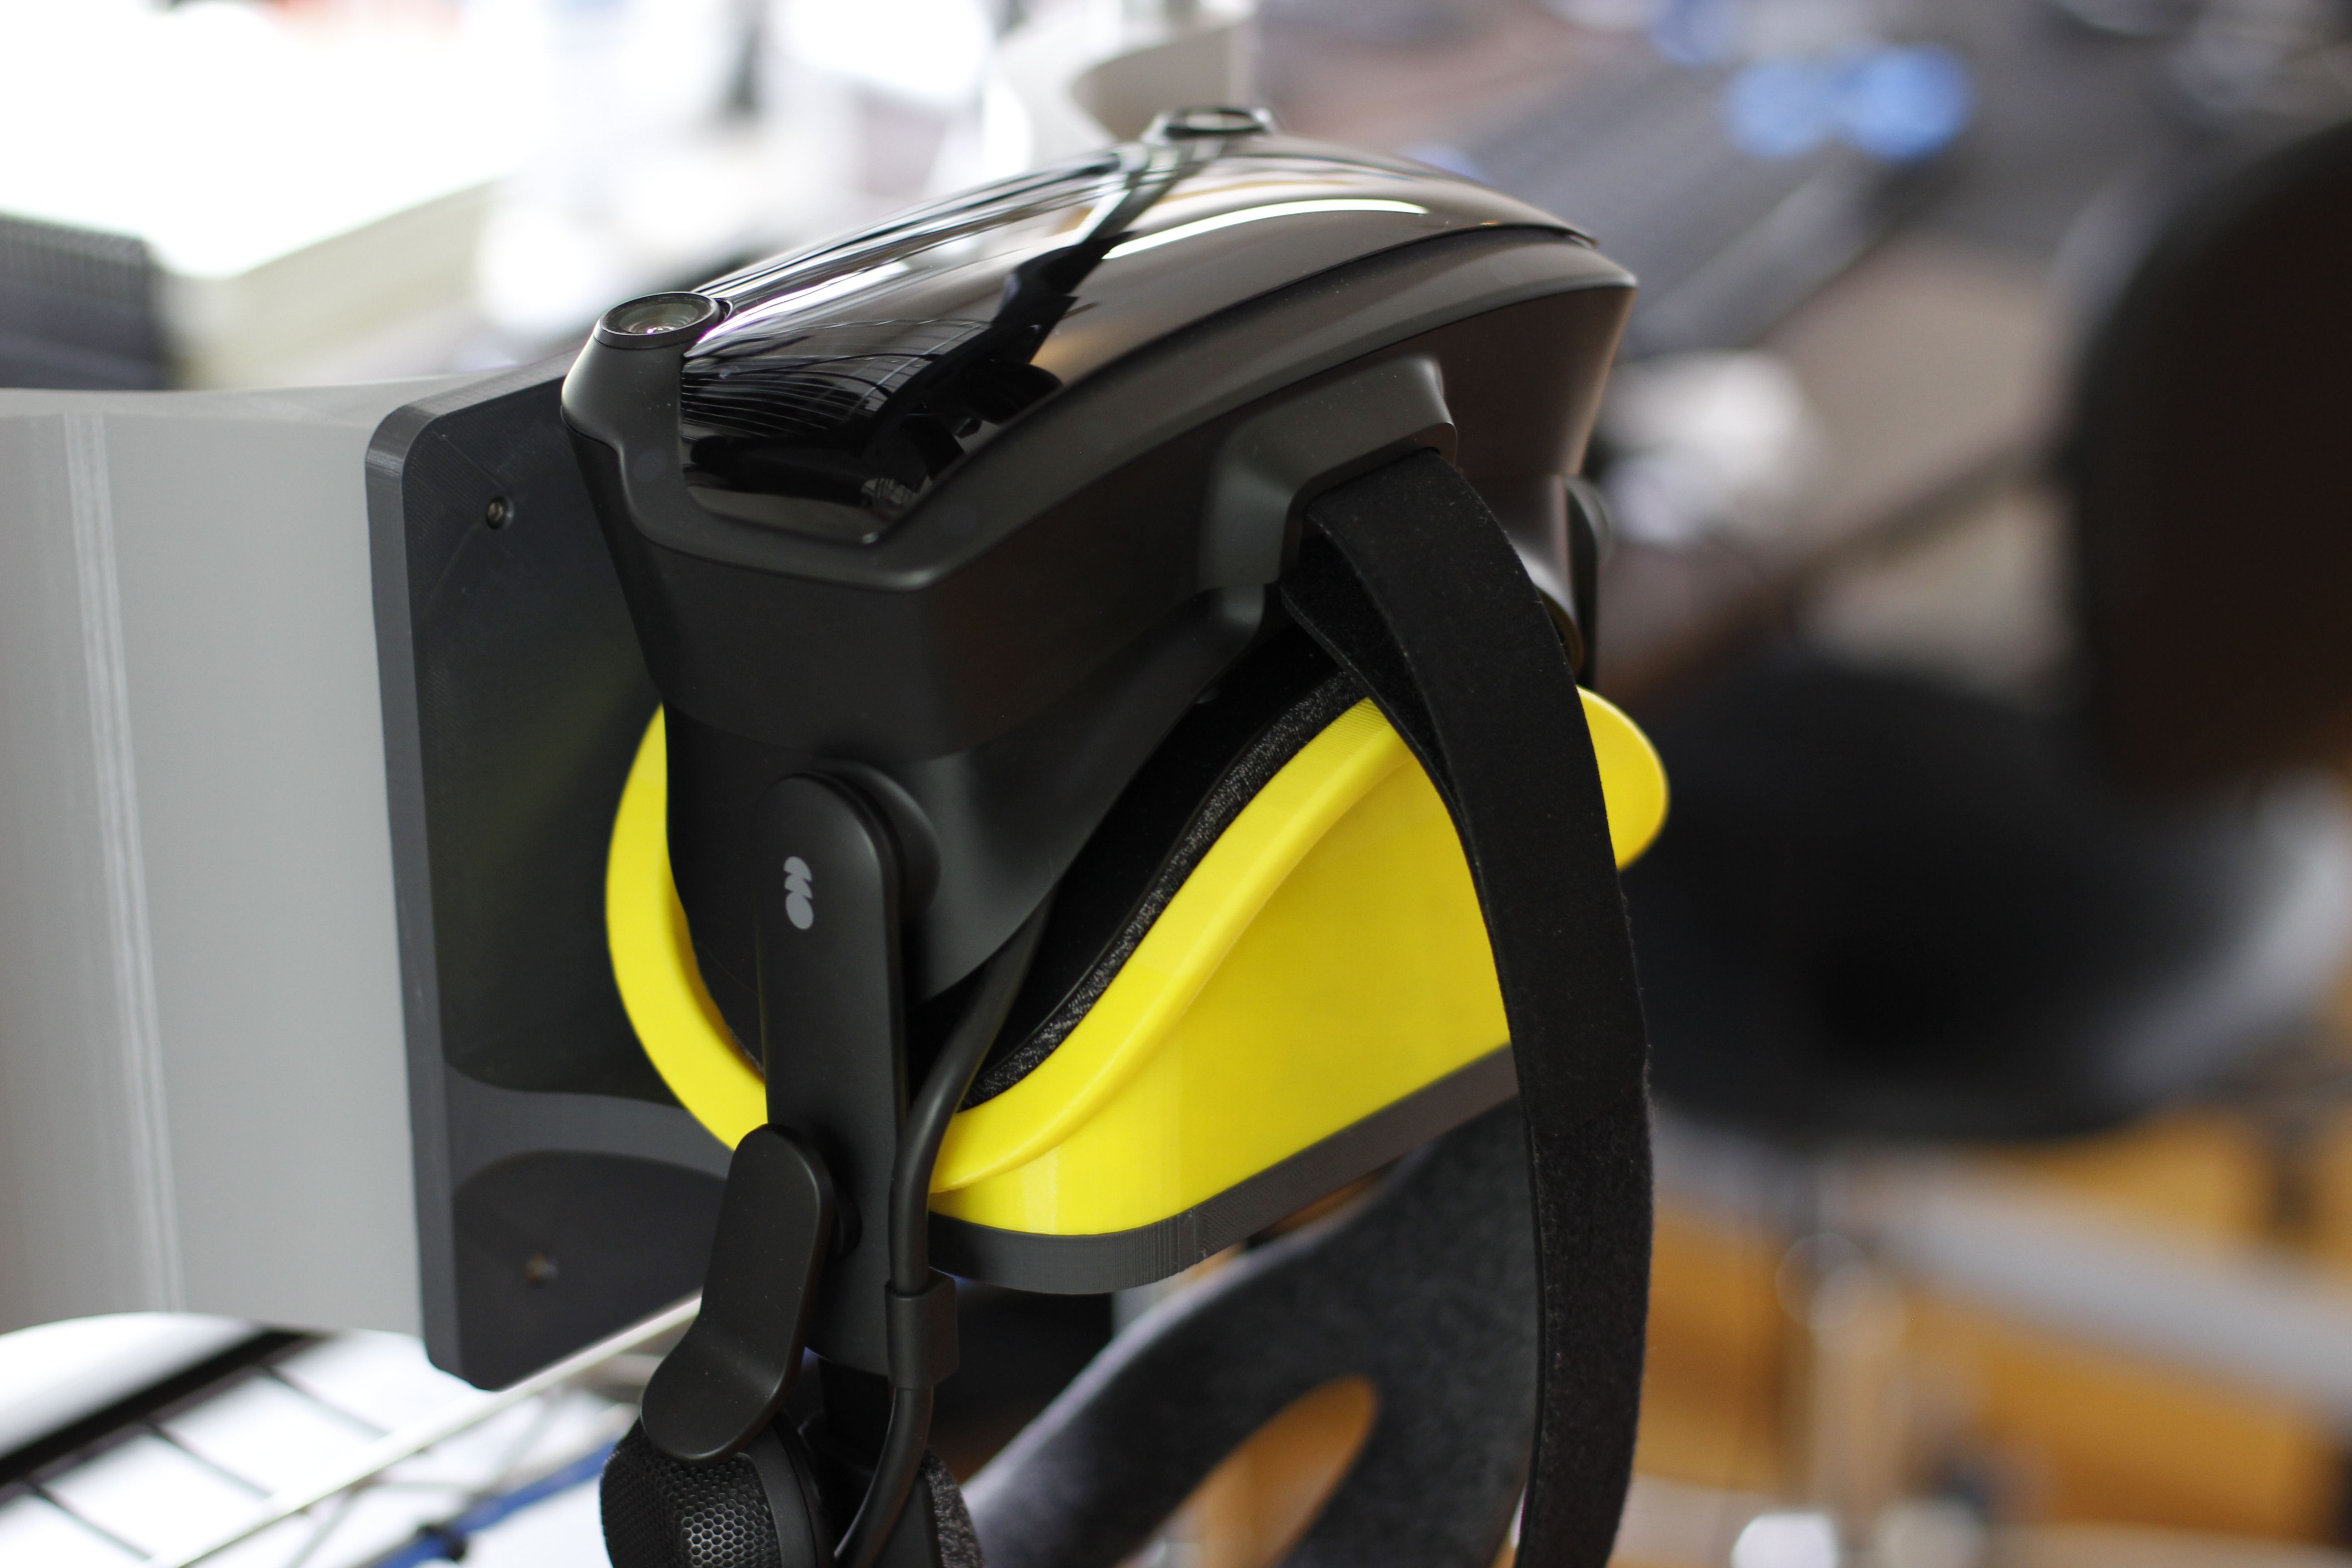
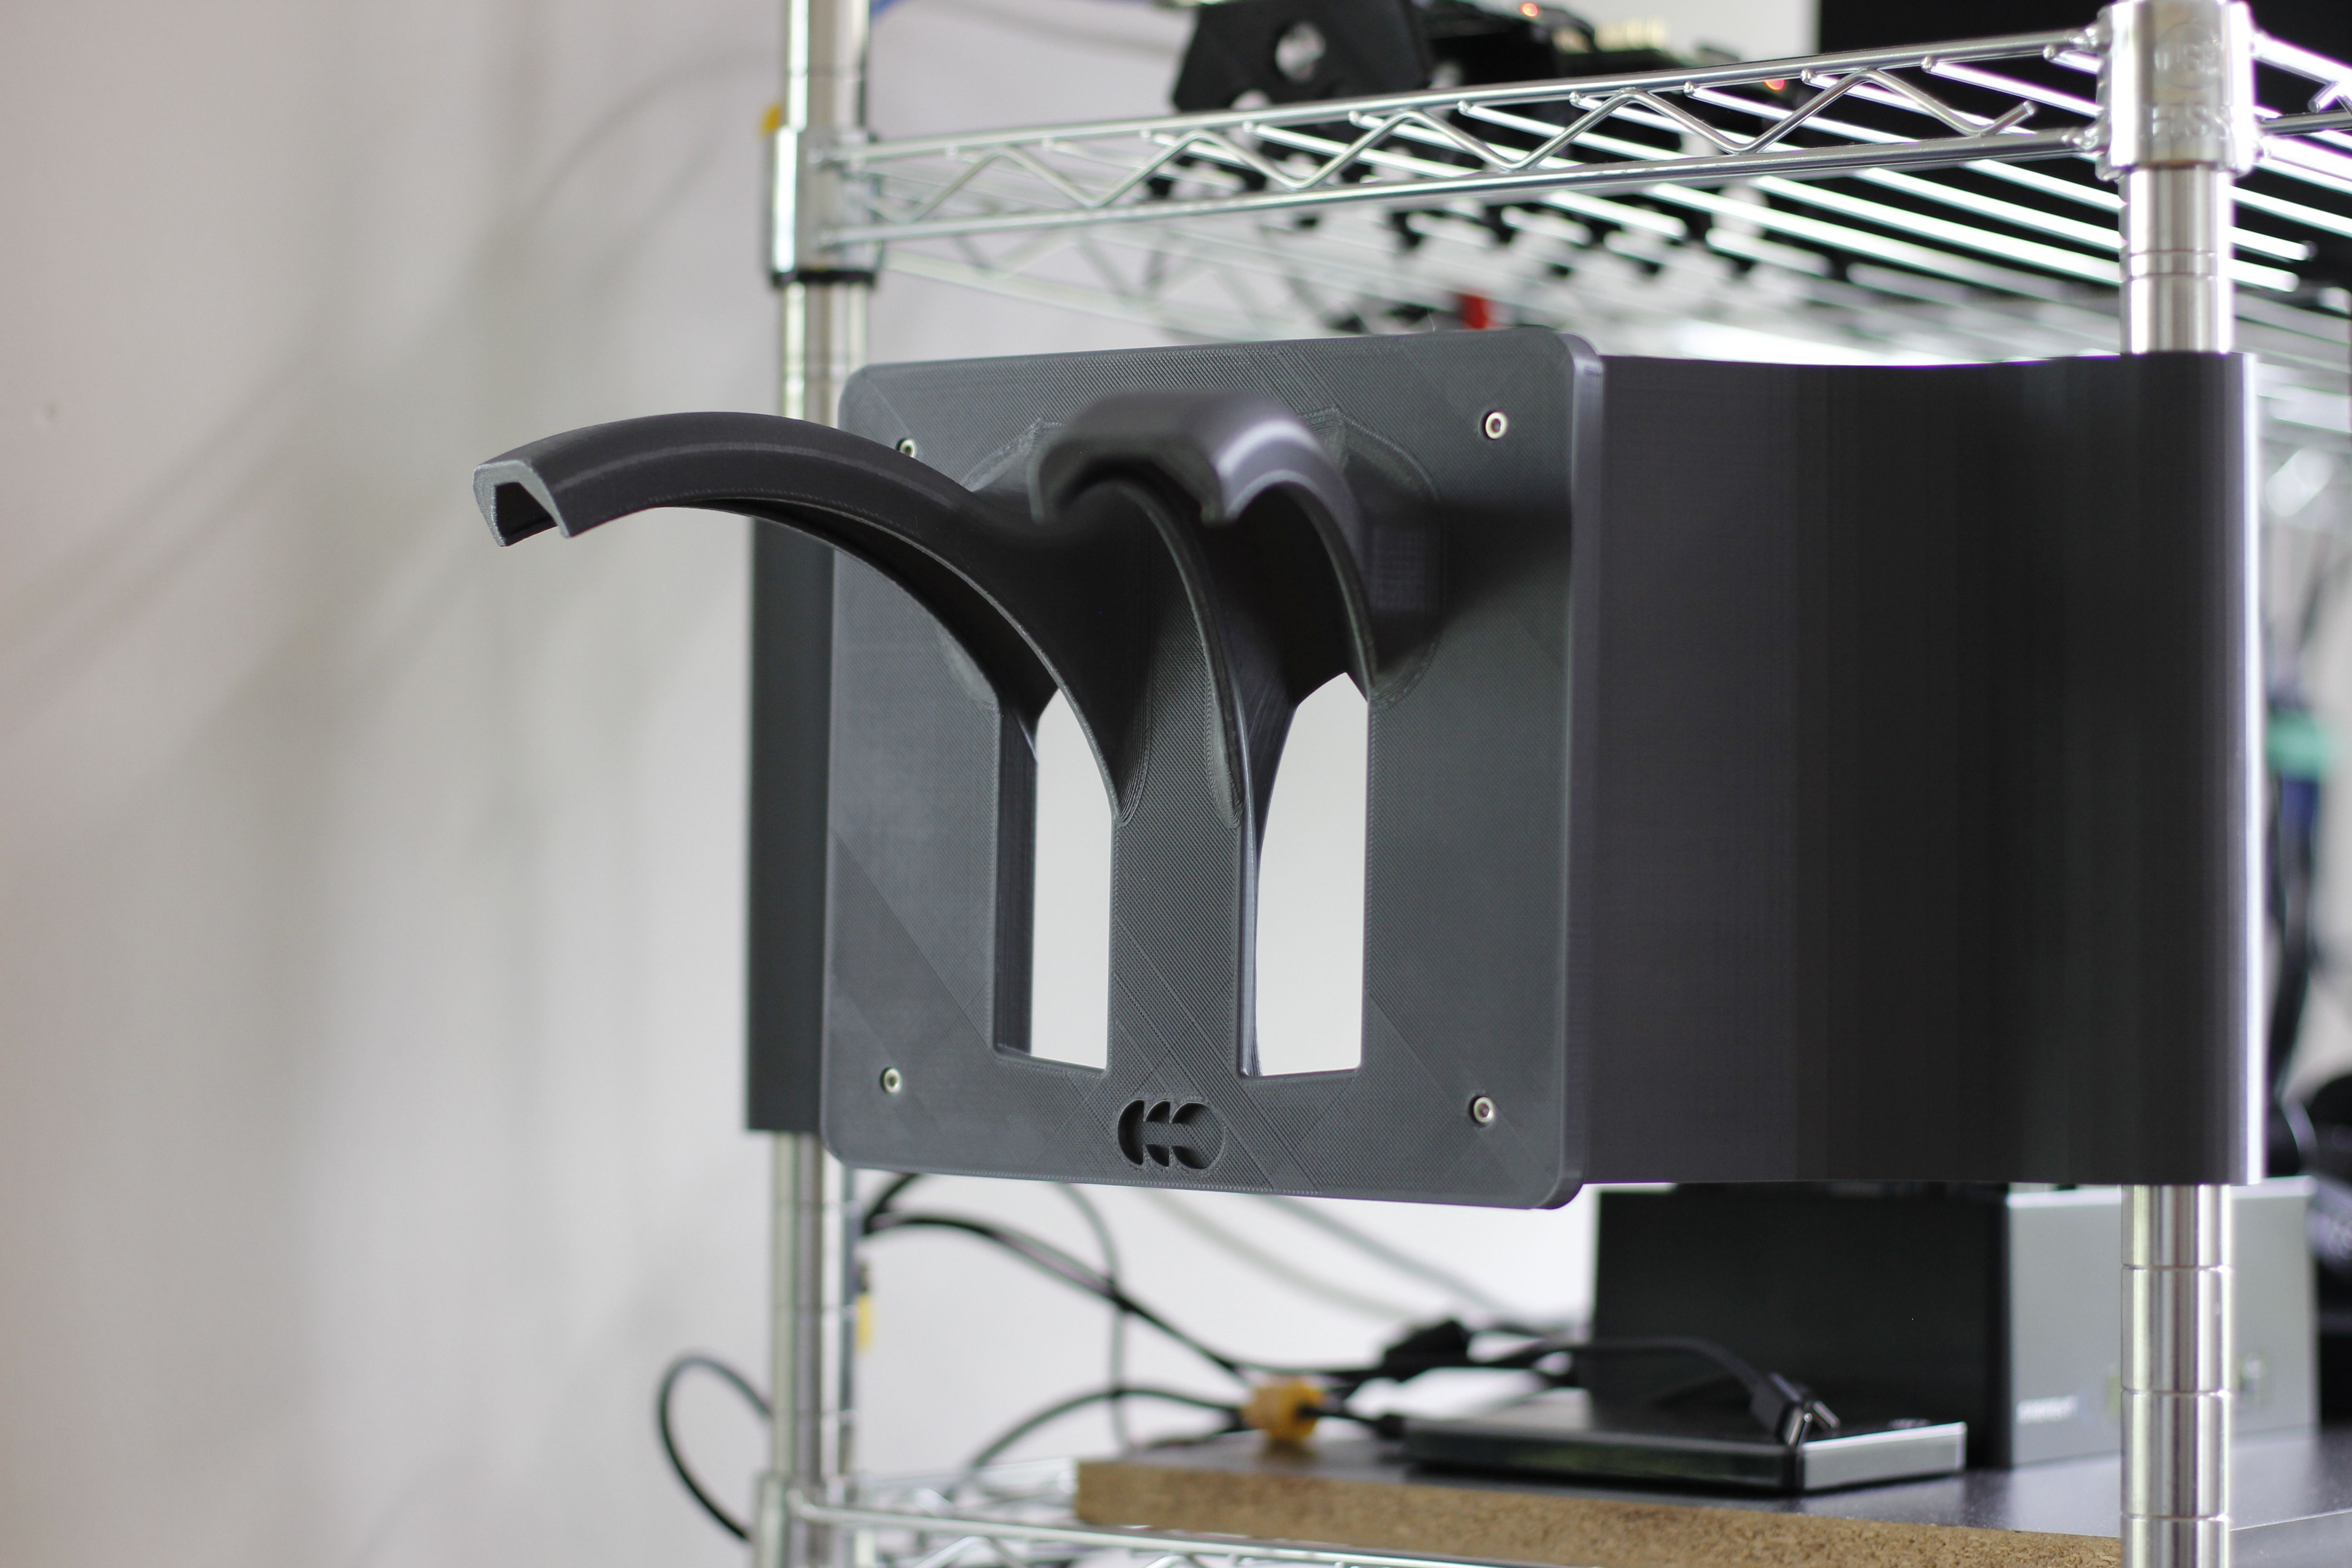
The next part I designed was the Knuckles slots.
The huge swept semicircle on the outside of the controller is amazing. It moves the center of gravity right to where it needs to be.
These controllers are without a doubt the most elegant way I’ve ever interacted with a machine. The sensors, motors batteries, every element of the design leap’s out of the way of the user’s experience.
This semicircle is also the basis for the slots on this part. It was a nice constant geometry that was easy to understand and model around.
Having these swept cuts continue through the base of the plate allows access to the USB ports. Conceptually, this keeps the front facing experience clean of wires, but my shelf is so busy with those anyways that it doesn’t really matter at all.
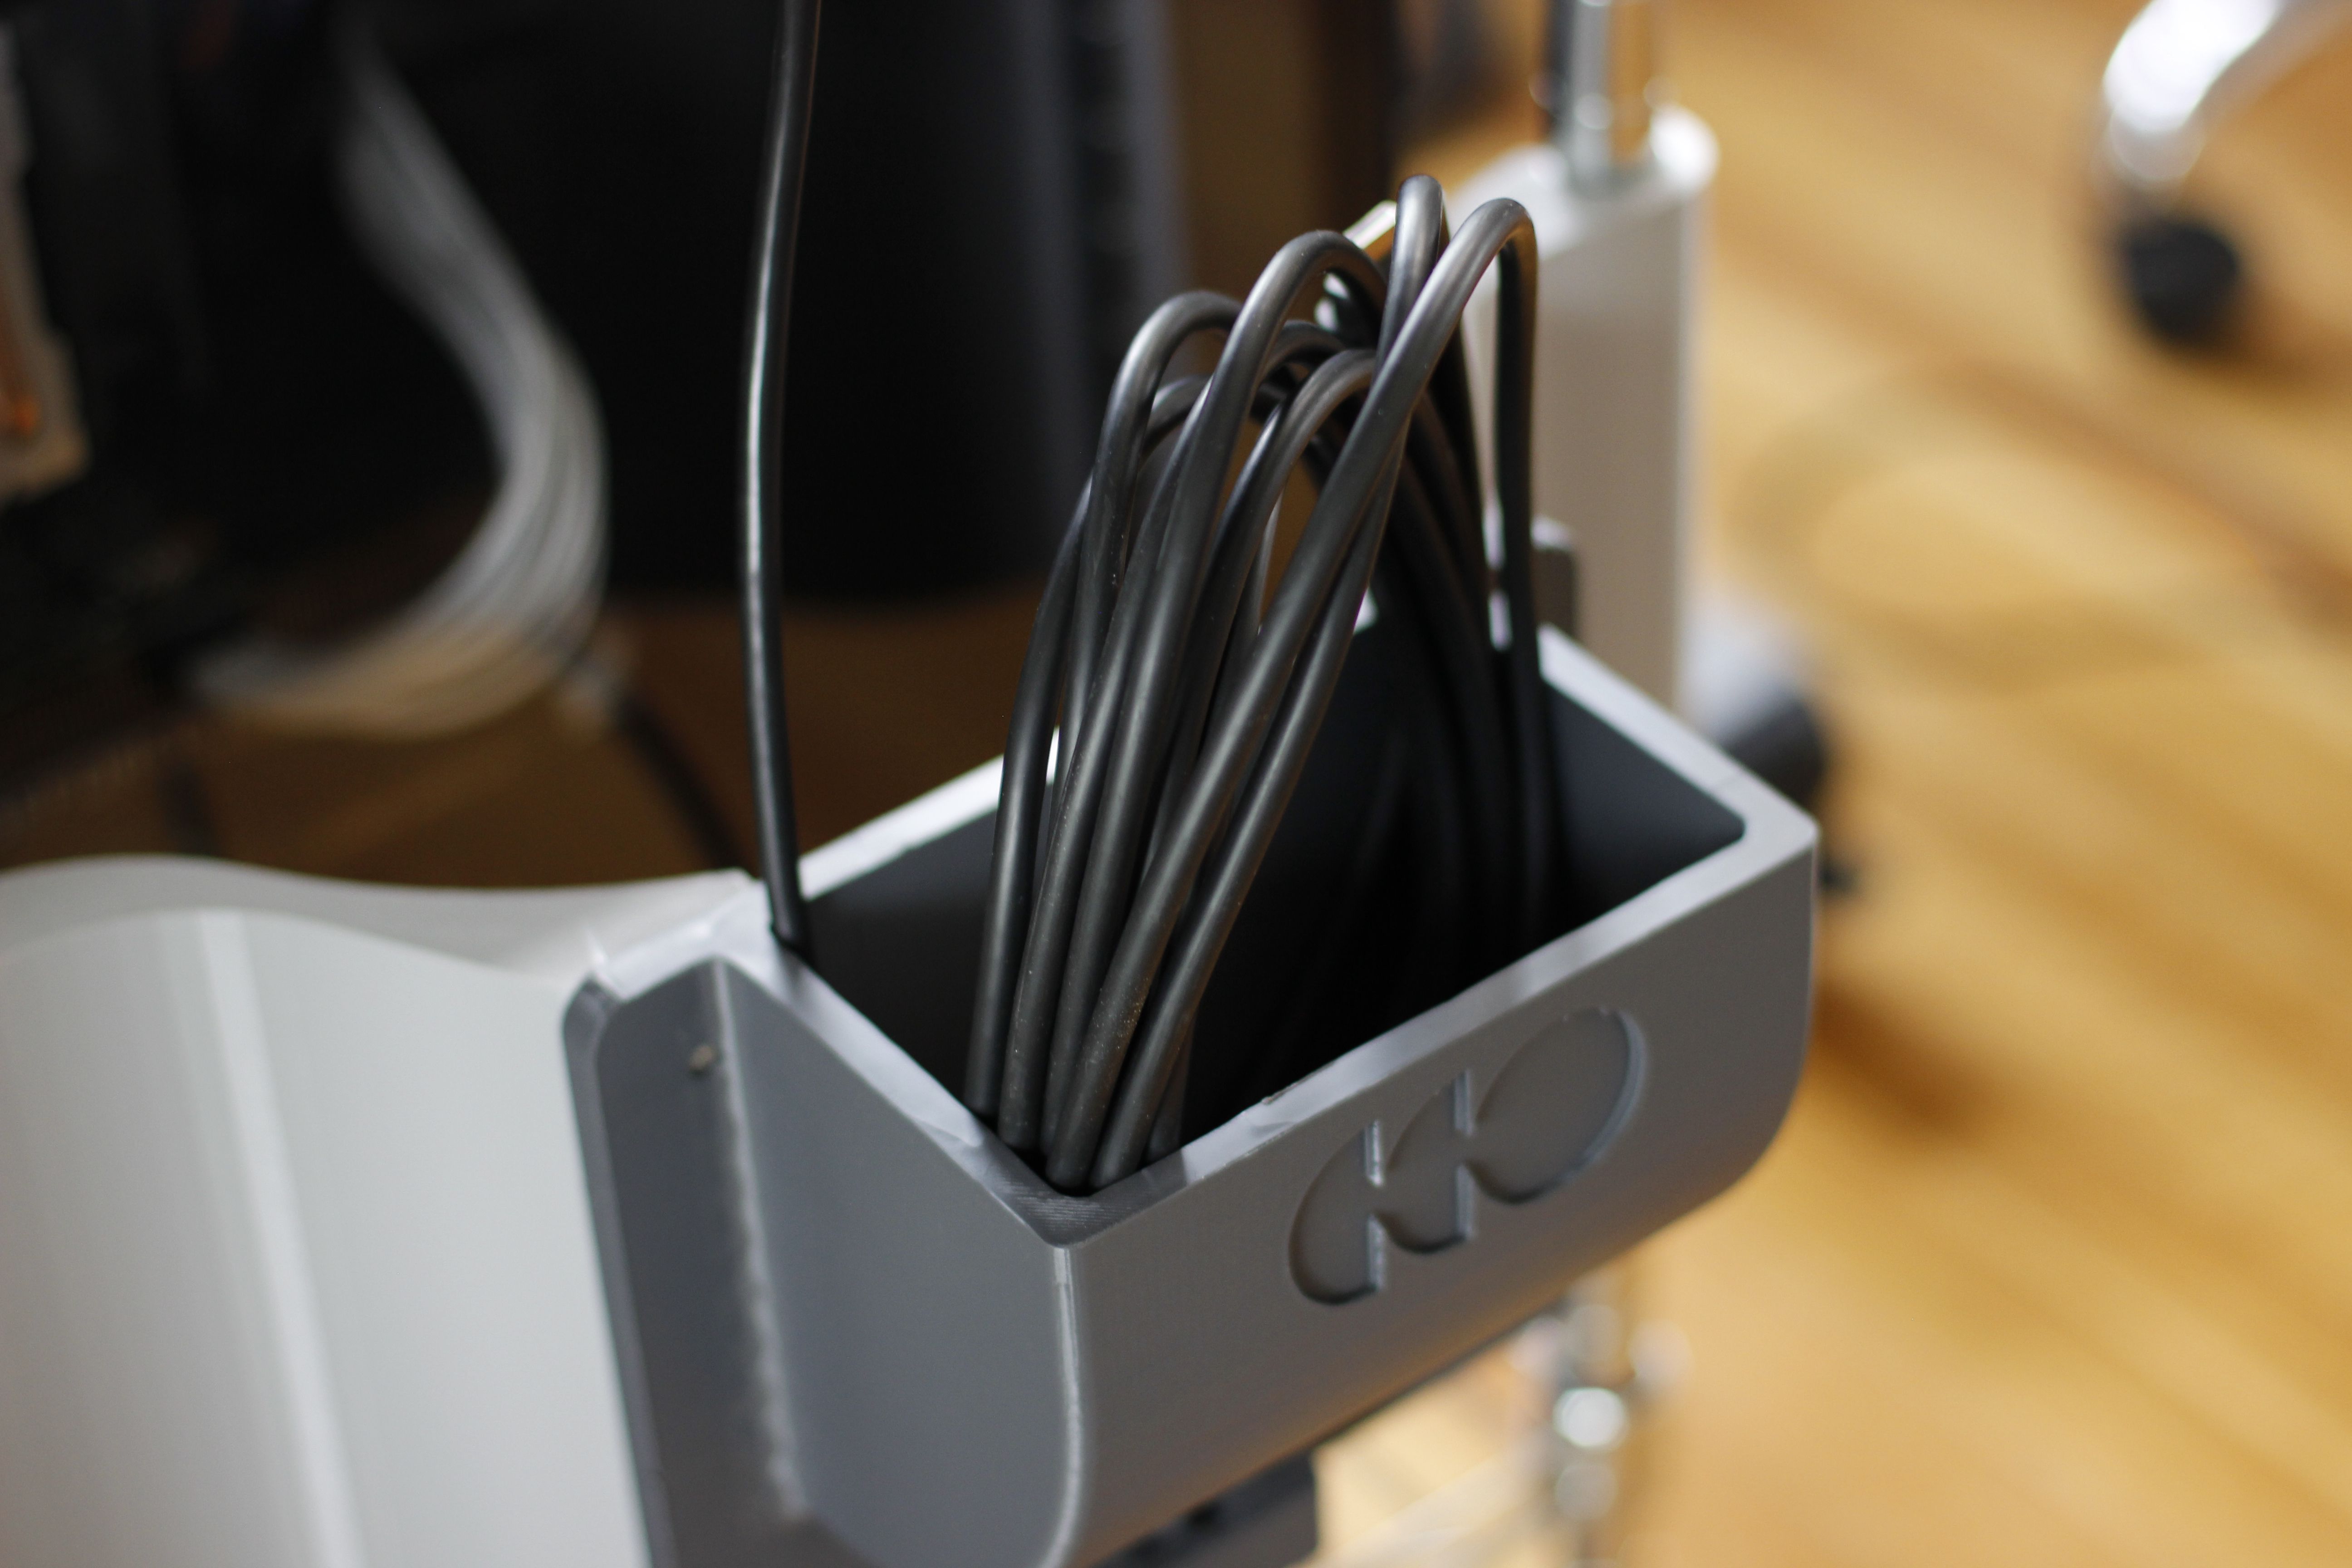
Next is what I’m calling “The Bucket”
Originally this was going to be something akin to a marine cleat, but that idea didn’t make it onto the printer and even saying that out loud at this point sounds kinda dumb.
Using a loose coil like this makes sure the cable doesn’t get kinked or twisted while in storage. It also comes out quickly when you have a few minutes between work calls.
The clamp at the bottom of the plate holds the PC side of the cable in place.
In my opinion, this is the part of the index’s design that could use the most improvement. It seems dangerous to have high end PCs connected without mechanical relief to people running away from headcrabs or dodging laser blasts.
This way the replaceable cable will get damaged before the graphics card or motherboard attached to it does.
The last part of the design is the pole hooks. These attach the plates for each of the other components to the wire rack.
The fitting took a few design iterations, the goal was to be able to install these by hand, but make it really difficult to remove so they wouldn’t fall off.
They’re angled away from the shelf, making the plates come out of the shelf which looks nice, and makes it easy to grab the peripherals.
Instead of two through holes to mate the two pieces together, I used a through hole and a slot here that provides a little bit of wiggle room to compensate for fitting problems shelf to shelf.
Also, I don’t know if the shelf I have is a standard size or anything, but having these pieces be discrete means all you’d have to do is re-design this part for your shelf rather than the whole system.
This part will also get used in other projects around the studio, I’ve been meaning to build a huge filament spool holder for a while and these will be able to provide the mechanical load for that no problem.
So that does it. Like I mentioned earlier, there’s a link to a blog post with the CAD files and links to the fastening hardware used in the build if this is something you’re interested in making yourself.
If you end up using these parts, particularly the HMD mount in another build let me know – it would be exciting to see.
If you don’t have a printer, shoot me a note and I’ll see if I can mail you some parts or something.
Alright! Thanks for watching!
3 Comments