Plane | First Functioning Xbee test

So the first round of parts have come in for the plane, including the Xbees and the UartSBee V4s. My life is going to be very scattered over the next 4 or 5 months, so I’m going to be making frequent rudimentary posts for my own benefit.

Here’s a video:

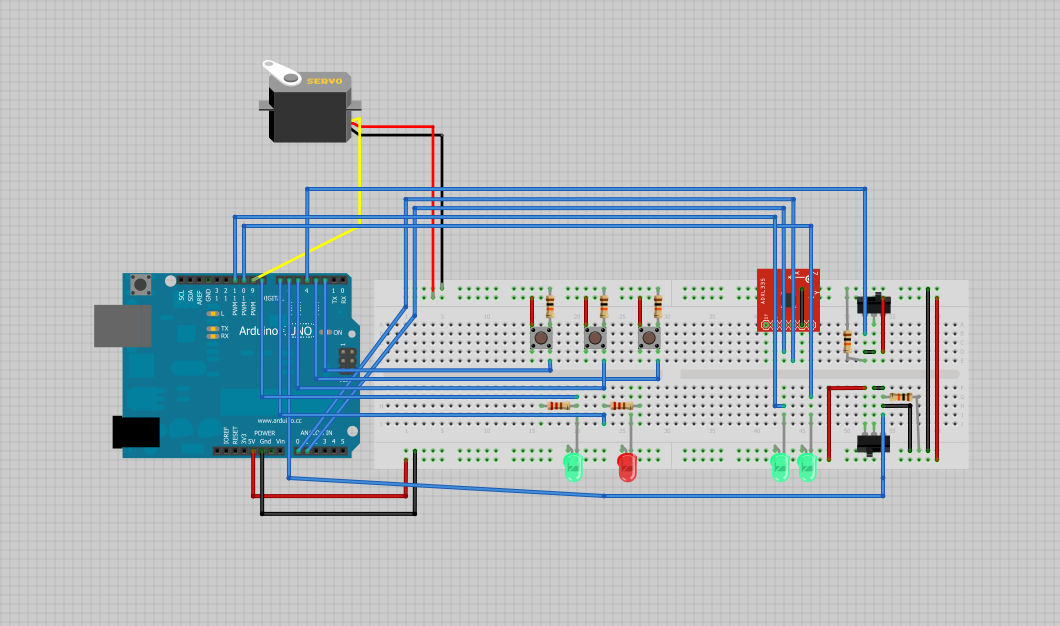
First thing’s first I want to outline how everything’s connected.

The first xbee is connected to the first UartSBee which is connected to an Ardunio Uno which is connected to the first computer which has the console open and is looking at the serial stream at 9600 baud. The xbee is connected to the uno via Software Serial which is detailed in the code below. Here’s a picture:


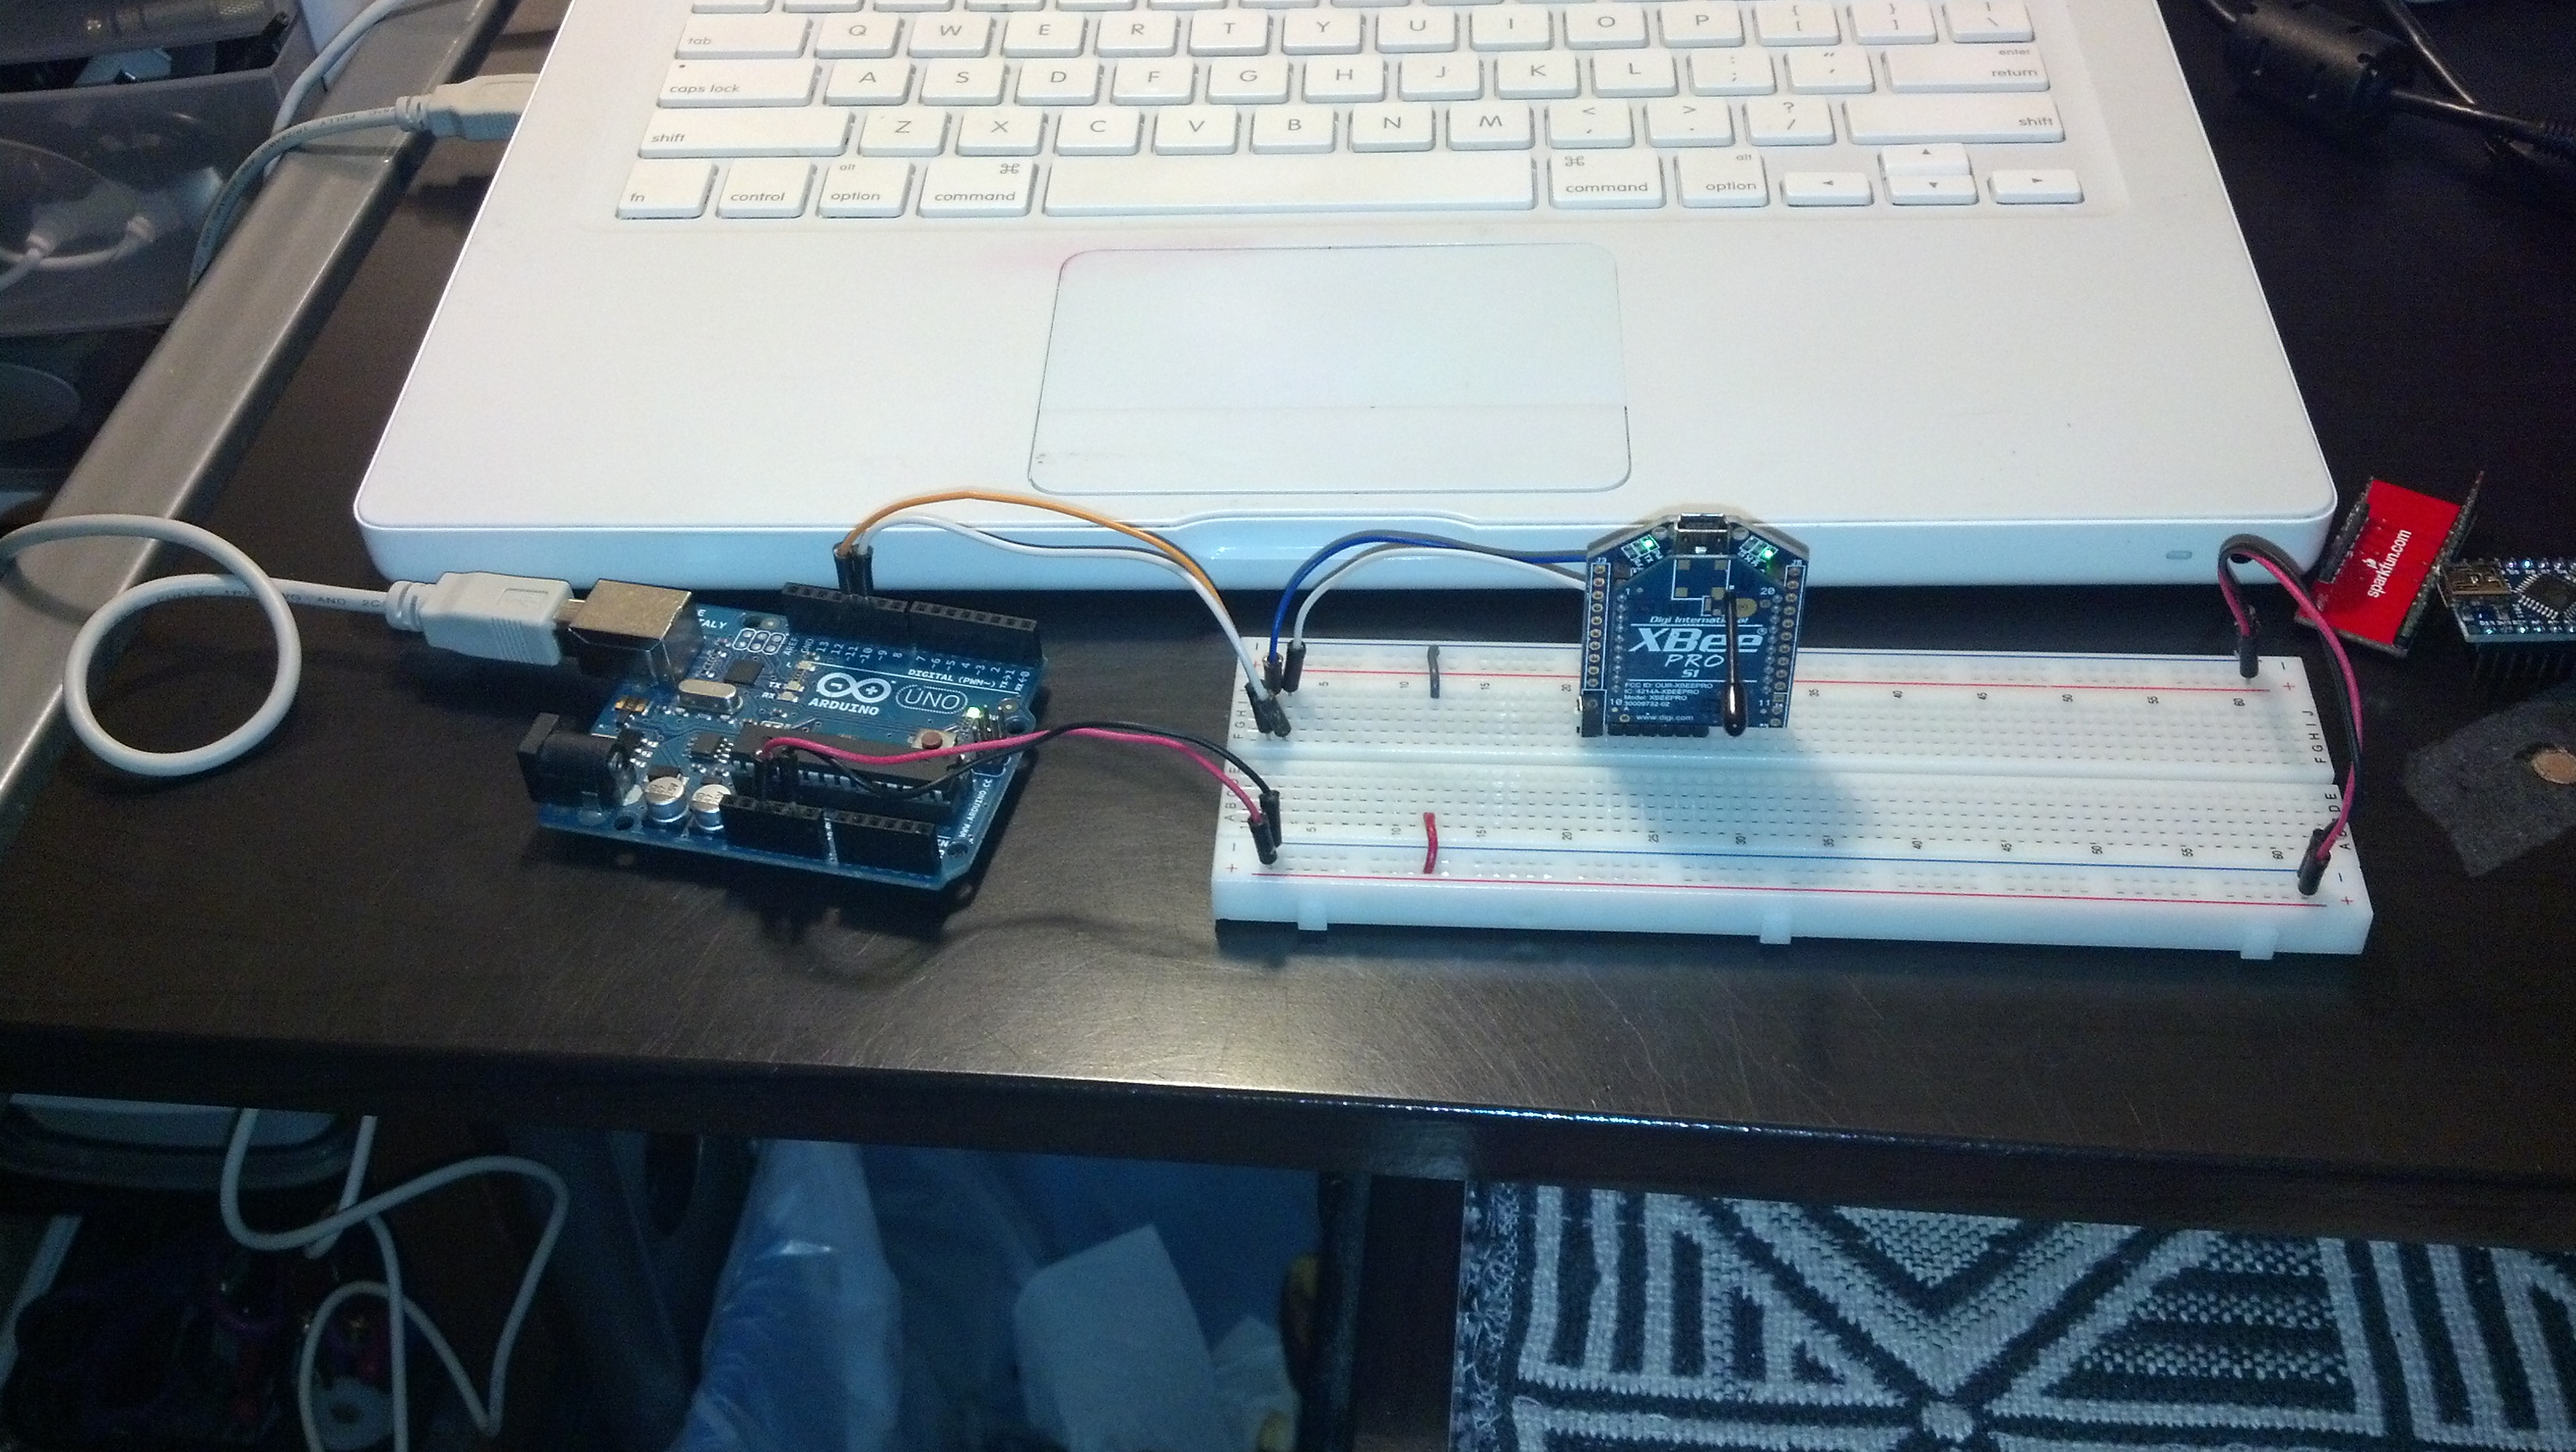
The second setup is identical, except i’m using an Ardunio nano.

Here’s the code, I’m using the SoftwareSerial library to accomplish this. Both Arduinos are running the same thing.

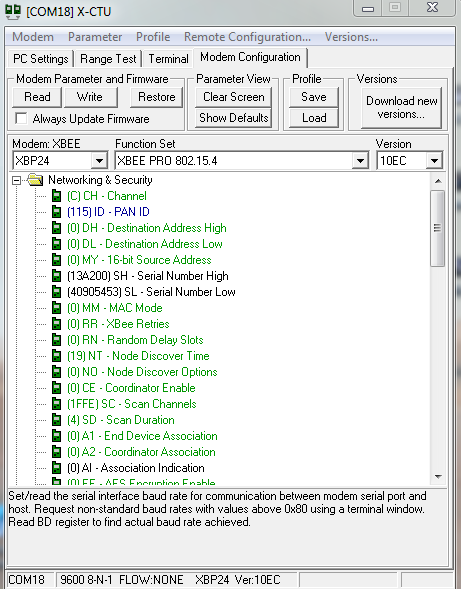
Here are a few pictures of the X-TCU setup. The baud is at 9600 and the pan ID is 115. The UartSbee itself is running at 115200 baud connected to the computer.

Thanks for reading!

Hey! This post was written a long time ago, but I'm leaving it up on the off-chance it may help someone. Proceed with caution. It may not be a good idea to blindly integrate this code or work into your project, but instead use it as a starting point.

Raspberry Pi Media Server | Mounting Hard Drive & Better Minidlna Config

Please note that this is more for my sake. To mount a hard drive in raspbian do the following: Make sure you have ntfs-3g installed by running:

Then mount the drive read/write with the following command:

And it shout be mounted. /dev/sda1 is the location of your hard drive. Now to configuring minidlna. Location of minidlna.conf file and access command:

This is the file I’m running right now. As I type this i’m successfully streaming to my Kindle Fire HD (the reason why I’ve decided to really make this thing work) but I’m not sure if it’s stable. It’s also able to stream to VLC as of now.

Hey! This post was written a long time ago, but I'm leaving it up on the off-chance it may help someone. Proceed with caution. It may not be a good idea to blindly integrate this code or work into your project, but instead use it as a starting point.

Plane | Corrective Balancing Mechanism

First of all, here’s a video of this device in action.


So things are really starting to take shape with the plane (still unnamed…) and I’ve got a really solid framework for an auto-balancing system. Basically the program below maps the x value given from the ADXL335 to a value from 1-180 on the servo. A lot of this code is for debug, but that portion can be switched off.

Sorry for the lack of comments in this code, it’s pretty intuitive though, at it’s core its all about the map command.

Here’s a picture of what my desk looks like:

Here’s a picture of the fritzing document, which can be found: here

Thanks for reading!

Hey! This post was written a long time ago, but I'm leaving it up on the off-chance it may help someone. Proceed with caution. It may not be a good idea to blindly integrate this code or work into your project, but instead use it as a starting point.

Raspberry Pi Media Server | Speeding Up Raspberry Pi [Documentation]

So although I haven’t written about it yet, right now I’ve gotten a Raspbmc Server up and running along with Minidlna. It works great for about an hour at a time and then it really bogs down. This seems to be caused by a combination of Raspbmc and the hard drive spinning down. My solution is to try OpenELEC, overclock the Raspberry Pi, and change out the SD card for one with a faster read/write speed.

Hey! This post was written a long time ago, but I'm leaving it up on the off-chance it may help someone. Proceed with caution. It may not be a good idea to blindly integrate this code or work into your project, but instead use it as a starting point.

Basic Wetness Sensor

So I’ve had the idea for a while to try and automate the growing of plants so I need to be able to tell if something’s wet or not. Here’s a video:

Basically the hookup process is that of a regular analog sensor with this in it’s place. There’s a 10k pullup resistor as the voltage divider.

Here’s the source for the Arduino.

That’s pretty complex but I was trying to make the light changes more drastic so it would show up in the video better.

Here are some pictures of the build process:

Thanks for reading!

Hey! This post was written a long time ago, but I'm leaving it up on the off-chance it may help someone. Proceed with caution. It may not be a good idea to blindly integrate this code or work into your project, but instead use it as a starting point.

Encoding A LOT of video in linux | [Documentation]

For my Raspberry Pi Media Server to be able to stream to mobile (a topic I haven’t yet covered here) I need to convert ALL of the video in my family’s 700+ file, 400+ gb, media collection to H.264/MPEG-4 AVC. I recently acquired a hard drive to consolidate and store all of this hard drive on. For the past week or so I’ve been making some progress in converting the video. On my windows tower I’ve been using the program Format Factory to convert the video. I’m running into a few problems with this. For one, my windows computer is my main machine, and multithread converting really bottlenecks it. It also takes a long time – having to watch it while it does it’s thing waiting for it to convert instead of just going to the next set of files is annoying. I could just convert

So I’ve decided to get back into python and write a program that will perfect the conversion process. Like in my PiScanner project, I’ll be using an existing program within python and my code will automate the process.

Goals are as follows:

1. Convert the video

2. Make sets of folders for the video

3. Have it all done on the external HDD

4. Have it be more “efficient” than the setup I’m running now. I.E be able to be on all the time – which shouldn’t be a problem as the server you’re viewing this website on is on all time time and I can just run the script here.

5. Make the end program useable for anyone.

Hey! This post was written a long time ago, but I'm leaving it up on the off-chance it may help someone. Proceed with caution. It may not be a good idea to blindly integrate this code or work into your project, but instead use it as a starting point.

WordPress installation on ubuntu 10.04

There are probably a million tutorials out there to do this, but as I’m doing it for the second time, I figure that I should probably write it down.

First thing’s first, make sure you’re all updated:

Then install lamp

and run through the install process. Make sure you write all of that info down.

Then download wordpress. Assuming they still have their download architecture the same as the time I’m writing this, you can just use this command.

And unzip this file.

You should see a LOT of stuff unzipping.

Then remove the tarball

Now you need to create a database.

Write down this information.

Next move your wordpress folder to where it’s going to be seen by the web, in my case /opt/bitnami/apps/wordpress/htdocs/risp

rename the file “wp-config-sample.php” to “wp-config.php”

edit it using your favorite text editor, in my case vim

Follow the instructions in the document to add your MySQL DB stuff that you established earlier.

At this point you’re pretty much done. Navigate you localhost/wp-admin/install.php in your favorite browser to set it all up.


To be able to upload images, you will need to run the following command:

To be able to use custom permalinks within wordpress, we’ll need to make a couple modifications. The first is modify the apahce2 virtual host settings with:

Change the /opt/bitnami/apps/wordpress/htdocs/ settings so AllowOverride None is set to all like so:

We will also need to give the proper permissions of apache to the .htaccess (found in the root directory of your wordpress install, mine is /opt/bitnami/apps/wordpress/htdocs/) file by running the following commands:

Note: If the file does not exist, you can create it with:

Hey! This post was written a long time ago, but I'm leaving it up on the off-chance it may help someone. Proceed with caution. It may not be a good idea to blindly integrate this code or work into your project, but instead use it as a starting point.

Raspberry Pi Media Server | Streaming To Any Source Using miniDLNA [Documentation]

I’ve made some progress on the RPi Streaming Server.

To replicate this you’ll need to do the following:

1. Install miniDLNA

2. Edit the config file to how you want it. Edit it using vim

3. Here’s what I’m working with, and it works.

You can grab the file itself here. The only thing that’s different is where I put the media directories. The rest of the instructions are still in the .conf, it’s much simpler than mediatomb for example.

Here’s a video of the whole thing working on 3 devices!

Hey! This post was written a long time ago, but I'm leaving it up on the off-chance it may help someone. Proceed with caution. It may not be a good idea to blindly integrate this code or work into your project, but instead use it as a starting point.

Rpi Media Server | Testing video playback from external data source [Documentation]

So first we need to make sure I can output video files from a usb source.

I’ll be using “usbmount” and omxplayer, to get these packages make sure you’re pi’s setup correctly and run the following commands:

Note: make sure no storage devices are plugged into the usb port when you install “usbmount”

Once those are installed you can start trying to play videos off of the usb drive (eventually the thumb drive  will be replaced with a large hdd

I’ll be using filezilla to transfer to and from the pi.

Check out the video below to see omxplayer in action:

Edit: The upload failed and I forgot to check on it. Come back soon for the video.

I’m choosing to debug my Pi over composite. The reason being is because I’m going to be working a lot with video outputs, and I don’t have a second hdmi ready monitor. I’m going to be using the EasyCAP usb video capture card. This will also give me the ability to record what i’m seeing as well. This 100% better / much more efficient than buying a second monitor and filming on it. Of course when this is ready for implementation, it will be plugged into a television with HDMI so the picture will be amazing.

Hey! This post was written a long time ago, but I'm leaving it up on the off-chance it may help someone. Proceed with caution. It may not be a good idea to blindly integrate this code or work into your project, but instead use it as a starting point.

Rpi Media Server | [Declaration]

The goal of this is to become independent from cable TV while still being able to do all of the same things we would with a cable service – I.E still consume content in the living room on the television.

It should also improve upon the experience. I want to be able to stream content from the Pi to any capable device. That list includes but is not limited to:

I’ll be working on this post most of today, so they’ll be a few posts coming.

Hey! This post was written a long time ago, but I'm leaving it up on the off-chance it may help someone. Proceed with caution. It may not be a good idea to blindly integrate this code or work into your project, but instead use it as a starting point.